U.K. MGB GT Sebring Restoration Episode 15 “ Building it back, just for the craic…"
Apr 03, 2024First things first today in the realm of the rustic post minister, I decided to deliver us some flat pack MGB steel panels,
just
open them up, there we go, this one is made specifically for the MGB GT and they are also available for all cars. So hidden in our possession here we have many, many patch panels and body panels right on the wood, so now, although the painters value this plate, I think it looks a little better, actually because I was trying to show you some of the Other things also the last time I painted BM, let's give them a little lighter, here we go, ah, we painted the drums and we painted the taillights and we also painted the drone briefly, they were the acting arms throughout the call.
Next thing I think today, save power, turn it off, we're not going to drain the fluids out of this differential, we're going to take this whole turn to remove some duct tape and we're
just
going to take theback
plate off and do the parts that we just need to paint, so with something really something. pretty pulling this board, you see how you've done me, yeah, it's just a difference and they don't really go wrong too much, but it's still a good takeoff, remember we said that what I said, or we just tweaked this. edge when we're done there's something wrong with that little stain your roses and no one will ever know well it explodes obviously but if you don't tell anyone I won't do it I wouldn't want to have to do it now it's Reno del del diff I think we have a filler here and below we have Tim, we have a drain plug, first problem of the day we don't have a wrench for one of these, so let's make one and he'll look for the springs there.
More Interesting Facts About,
u k mgb gt sebring restoration episode 15 building it back just for the craic...
Come on, that should do it, I think I just need to lower the sides a little bit to make it a little more comfortable, one side and that's it, you have aisle two. Oh, any other success, okay, let's see if we can't get it. This is ready, don't lose your nose now. I'm not an expert, it seems like you need to tell, but I'm pretty sure, so it wasn't meant to be, why would I go that route eventually? But I say I won't. go down to help absorb and I wouldn't ask if they have the EP 80 90 or whatever you can have it in black please rice let it drain.

Now I'm going to clean this nice penis for me, it's nice. it's getting a lot easier let's take the
back
plate off another one okay I've never taken the back off one of these before so I don't know if these are all different length bolts or whatever so I'll try to keep them. I'll keep them in the right order so they look like half inch bolts and there's a big one, for some reason I can't remember which one is 9/16 sauce, so let's see. I can take the rest off, here we go, it's a well-worn method, but Tim, that's the best way to keep these bolts on or if you can hit a dog that's barking in the background, by the way, it's not my dog, so that the backplate you just bought and we want to fill a different batch of bits, oh you asked if I could help you so you broke the address sticks, you know what you were thinking in GN CLE so no I know if it comes in handy definitely Everything stinks.
Well, let's empty out what's left of that oiled ass anyway, oh, this is proving to be quite darling, okay, so we'll let them drag them to that train house and then we'll take a quick look inside to make sure they don't are nothing horrible and in the meantime, we're going to clean up that back plate and paint it along with those two end pieces that I removed earlier, okay, so we lean into place, we have the two bearing caps basically for the ends of the dip and these. It includes the end oil seal, so you see, I didn't know which way they were going.
They come with the cuff facing sideways. You see that and the smooth side on the outside will press them out for a minute, but first I'll just give them a little bit of force. clean up with a few last things first, just a fin scraper, nice thirds, not too sharp and we'll just get rid of the old gas so just put some tape over this to protect the mating surface for the year, big wrenches . They're all nice and clean, but these are the caps that go on the end of the shafts and they also hold the oil seal, basically just fast enough to make sure the mating inside face is really nice.
This is a wire wheel and we're going to take it off at the end because what I don't want to do is damage the inside of this while I'm cleaning it, so yeah, save the wire wheel stuff and then then press those seals on, so here we're with our differential and now it's time after we've obviously done all the painting and we'll have you on this useless job, but it's time for it to be practically finished, obviously. We remove the back plate now and we can see the inside. It's really good inside, it's absolutely fine, but I didn't expect it to have any words anyway, but there are no nasty splinters anywhere.
I had the feeling through the oil that came out saying. There was nothing interesting in the sense that I even fished with a Magnus and there was nothing, no presentations or anything, so what I'm going to do is what I'm interested in, everything I'm going to do. These dives are known for a noise glitch, in fact where basically, there is a dull thud in the end. I don't really expect this one to have it, but if I'm going to do this job properly and thoroughly and I want to knock the pants off this car when it's finished, I want to do something. miles so what I'm going to do is basically fix it which is add some thrust washers and a couple of cup washers or replace them anyway on this diff, it's standard stuff for a mg and I think it would be interesting. for people to say I basically learned how to do it on YouTube, it's not something I've done before, but it's pretty simple and I'll try to film it as a talk about it in as much detail as possible.
Yes, I'm going to do the D tapping work on this center part of the differential. I will be new. I'm not going to renew these bearings, but I will renew the oil seals on each end of the bearings. I'm going to renew the pinion and oil leak here and there between those three jobs, they are the ones mg owners are most likely to do when selling a higher mileage car again. This is not a high mileage car, but it is interesting to see the works. It's interesting for me to do it, it's something I've done before, so I'll learn a little bit because it's long and I know how to do these things.
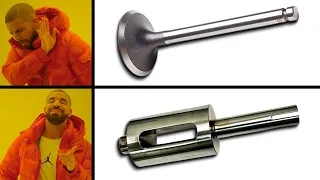
Well, YouTubers are really watching your channel, so there is nothing new here that you can do. I will but hopefully if it helps someone or if I film a slightly different way or explain in a different way maybe they will help you so it's time for some engineering let's make the thrust washers I think and the cup It is washed inside first to do it now. I am not going to try to teach you how a differential works. I'm sure if you're watching this video you probably know how it works anyway, but let's see what the pieces are inside and we have how we have a crown wheel here, it's a big wheel that we have if we just turn this, I think we should sit down. everyone in it, here we go, we have the transport cage that is here.
We have two sun wheels, one on this side, one on this side, and we have planet wheels for each of these smaller upper and lower wheels. Okay, now that C is a little bit of play, not very rocky, but there's hardly any play in that at all and I don't know if you can see it inside, but coming this way towards the camera from the driveshaft is the pinion, so the pinion drives the ring gear which drives this cage with the sun. gears and the planetary gears inside, okay, before we start working on this, because what we're going to do is replace the two thrust washers on the edge of the sun gears and the cooking washers that are on top. and the bottom of these planetary gears, but before we do that, we have to remove one of these, one of the difficult ends and the difficulties come this way, so I'll have to find some type of bearing puller, Toxie, and pull the half shaft out to give us some room to access the other thrust washers and things in here, so that's the first job, so how am I going to find this, which is a Malay back plate, the spare one, and that it adjusts very well to the distance? between these two holes is exactly the same as the distance between the holes at the end of the axle tube, which is really good, so what we need to do is take two pieces of threaded bar and pass them through these but not through the end and as I roll these up then this will take the bearing out of the race so I need to turn them down on the lathe and I know we need to rethread them so that's the next job now these ends need to be turned down to round them off. nine millimeters okay so tell the final assembly of our homemade bearing puller so we have our two threaded bars here so we put a rope on first and then we wash it we have no intention of having them go over this face , the old bat place. and then we put a note at the end of each of these, you'll see I'll ground the old blackening dam, whatever it is, it's not Japan, anyway it's a blackening of these bolts so they don't work properly and now Everything what we need to do is just weld in the center of these two so that we have a little bit of grip against one.
We're winding these nuts back to get the bearing off, so we only need to do a little bit of welding, so watch your eyes. Secondly, you know, I hope things become a little more obvious, it's a little hard to imagine that things like this will work until you see them in action, they really look good, so open us up, just put this here with those . located in those holes at the end of the axle tube, all the way to the nut, yes, now these knots are particularly straight, however, they are very hot, AHA, there we go, so the idea is that we use as in this case the 17 Mills. the best thing to wind these two knots back okay they're going to pull this plate back they're going to pull this bearing out and the way we stop these bolts from turning is with those and there are notes that we welded before and we just put a bushing on In the end, as long as we want them to come back symmetrically, she'll be absolutely fine, so I put it in there and we equalize it, that's it.
I'll zoom in a little bit closer so you can see exactly what's going on. That's tight. Right away, yes, I can watch a movie now. I'm not going to replace this bed and that's it because it's absolutely fine, you know, they're the first ones I keep saying, but it's just going to drive you thousands of miles and it doesn't show. I also don't like your hard miles and having them spend more time in the garage, so I don't really see how there's no point in going somewhere new and reducing Mitch's absolute, you find he's turning out pretty well.
I will grant this to luck for 8,000 pounds. one hour in the short term that's all I feel like he's too lazy no, yeah, I'm just doing this by hand, let's go. I notice that the bird house is excellent. The first thing we're looking at is removing this pin that holds the pinion pin in, so there's the roll. Okay, now we need to turn the crown wheel so we can drill this pin. We're going to do this until we can see about a half inch at the bottom, so we just need to rotate the crown, we need to rotate the cage towards us.
No, it's not surprising. Calls. You could do this. I have you start tapping this pin after you know it's very loose and you can see that it has now appeared correctly. It doesn't look good there, but you can see it appeared at the bottom. I'll just show you that maybe you can see that the pinion pins just dropped, about an inch down, you just need to make sure this goes too far, but it will block the cage from turning again, which you had to do to lift a house, no need to turn the cage away from it, you know, it just falls down so we can be tracked, that pain extract, that pink, this pin should fall now, you'll notice. that there are flat sides on this and a rounded side, so the rounded side goes to the right and you see that there is a flat edge that goes to the left side, you just have to hit the pin, maybe up shouldn't be quite easy, so the next thing we're going to do is take out the sun wheels to look at the thrust washers and then we'll look at the copper, the copper cup washes or the brass cup washes that are on the wings of the planet.
Now what we can do is turn these wheels independently and you will see that the lower planetary wheel yes, here we go and you will see that there is the upper washer at the bottom and the others fell into the bathroom, this water is fine and there is the upper wheel and if you look here, you should be able to deeply engage the washer now, as you say, these cars didn't see a thousand, maybe 46,000 miles, so they're not tremendously warned, there's a little bit of where, although you can't feel a little bit. A little wear and tear on that and it's certainly a worthwhile job that you'll never need to do again.
We can now consider removing thesolar gears of some wheels. Here we go. It should come out and this one that still has its washer on and It's not too worn at all because we said there wasn't much wear on this again, it's still worth doing. Just trying to get it off, yeah Monday, here we go, can you face that? And here is our Ross washing machine, you may find it. Yours disappeared or fell into pieces and that's what clogs up the books. Like you said, this is new to buy the NIC anyway, so there you have it, that's what comes out of writing one now, what can we do to duplicate it.
Check that our spare parts are correct. I'm going to go and get those washers that we have okay so this is the kid we ordered let me get two washers here we go so actually if I look at this there's barely any left anywhere on that grip that's it , but anyway and the other correct size. you can see they slide pretty well in there, so two thrust washers, we have the two on top, embossed firing washes and they have a little bit of wear because you can feel there's a little bit of a ridge on this on the inside. , just to show you all the ones we are removing.
They have some words on them, probably almost impossible to see on camera, but right on this inner edge, here you can see that there is no raised piece and here, yes, you can feel that there is no part. so it's definitely worth making two of those and of course we also get a nice new rolling pin to ensure you get a review pin. Okay, the first thing that lasts until the pumpkins is first. Now we can remove the sun wheel from the left side. Here we go. It is not possible to go and again you can tell that the thrush clock is still there, it is actually not very worn most of the time it has been in the ones that cook washed on the top and the boss and the planning gears are they wake up fine, so we just put the new one in, wash it in there, it's quite lubricated, with some of the old oil, no, I can't, you know, I don't do it with the stretch marks on the left side and that just pushes in, take them out on the side right. there's no splines to line it up, obviously because the whoops are pushed that way, okay that's that side, now we can put the planet wheels back on, so the Boston planet wheel first, I know how many just push in, look the planetary wheel core washer in bloom.
In fact, you may find that you can put your finger through this hole, which you know, put the pinion pin through and just use your finger, still line it up there at the bottom. Well, now what we have to do is turn the wheel slightly. You see, all I'm doing is just pushing this bottom planet wheel back and that will turn the right wheel like this, the top planet wheel comes on now, as you turn it back, we should find that you align it just right. that we can push that back here, let me do that until they are absolutely opposite each other a little bit more, so basically these two planet wheels are smaller wheels, they just have to be exactly opposite each other so that the pinion pin can go completely through , check that that's the line at the bottom, which is the top, which probably doesn't say the cook downstairs washes the filling while I'm doing this, so I'll put it back.
I will show death, he is lying, which is fine below. We are thinking about putting up the pinyin pin cube. Remember that the floors go on the left side, so just turn the drawer a little. GN. Can you touch it? You can take too much to talk. You know, we can consider putting the top on. wash it and ideally align it with yours, it is not easy for me to rotate these gears and the cable, try now the only resistor that we should fail in this name, make sure that this pin aligns with the hole where this pin will be the only one.
The resistance we should feel as you re-type this is gently towards the gear and then you may feel a little bit of resistance and it lines up with what they are doing as you type all the way to the end, make sure the roller pin hole it's right. Hey, check to see that this hole is lined up, which it will be any day now. All I need is just a gentle tap just to align. Yes, you get our nice new ruler pin, which is extremely difficult to fit in a small pocket when you are. We have to defeat all the fingers, here we go, just this goes to this hole here exactly where the old one came off now we can use drift just to finish it right now to be in sales.
All you need is the end cap from the original bedding, which are Actually, we're going to use them backwards, so put them in there for a minute to relocate the shaft, there we go and prop them up a little bit anyway. the right robots so basically it's just a long threaded bolt with a washer and a nut and it looks like on the opposite side. finger tight and pretty much symmetrical, no, no, it's just a matter of targeting these bolts that will push this bearing in properly, so you got it nice and tight, so we're going to remove it, just to make sure you can do this. with a little touch you should be able to hear it's fully seated, yeah, next voice, before you even think about putting a gasket back in, we're going to clean this face up, so what I really don't want to do is for everyone.
These bits and pieces in with your, I mean, just old FTB gasket sealing and things right, doesn't mean we want them in with the oil or in there, so I'm just going to use my wife's best dish towel now. same, you can burst the backplate put on, so what am I going to use and when you use high Lamar to seal a paper joint, I hope this is okay again, it's not my area of expertise, but we will do our best to obviously everything This be cleaned, oh friend. You're driving me crazy like you squeezed some of this stuff out, camel.
Now this is not the only part that will form the seal. Actually, there is a paper joint on which I am also going to put a little Alomar so as not to look for wrinkles. Hey, pant Keys House of these things and I'll probably run a running count. Well, now we have our meetings, which Thor and Halima will also do. I'm going to smooth out both sides so that there is reasonably even training on both sides, yes, neither side. Anyway, we're going to take the masking tape off this painted block depending on these holes and we're going to paint paper there, so we're just going to spread Hi Tamar around this and then we're going to offer this versus the difference.
Now I've already lined up the paper gasket that was recovered in Halima on the differential that you could be with in Harlem and I'm just going to offer this, you just sent you with one of ours and that's it on our button door, so I hope it's okay, continue with the next job onwards
If you have any copyright issue, please Contact