HARDWOOD Vertical Slat Wall | How To
Mar 19, 2024Hello everyone, my name is Alicia Albrechtson from Neumatic Addict and I just finished installing this
vertical
woodslat
wall
in my bedroom and also in my kitchen. Woodslat
wall
s are nothing new, but with mine I knew I wanted to make a few things a little unique; first, I wanted it to be made of solid wood. I wanted to use the same poplar that I have throughout the house, including the kitchen and stairs. Second, I wanted my wood slats to be a little different than the average dimensions you might find on the shelf at your typical hardware store.
I decided to mill my own slats from solid wood boards, so keep watching and you can learn how to make your own wood slat wall. If you want, this video is sponsored by dapp products. Using a lot of
hardwood
like I did for this project, by far the most cost effective option is to go to ahardwood
supplier and purchase rough sawn boards. Rough sawn boards are much cheaper than surfaced or milled boards that are flattened and smooth throughout. four sides, but they require you to have some machinery like a thickness planer and require a little more work.
More Interesting Facts About,
hardwood vertical slat wall how to...
We purchased about 120 board feet of eight-quarter-thick poplar from our local lumber store. Eight quarters is the carpenters' fancy way of saying two inches thick. Whenever you work with solid, rough wood, you always want to buy material that is a little thicker than what you ultimately want to end up with. We ran each board through the thickness planer on both sides, slowly removing the material until we removed about a quarter of it. inch thick in total After the planing process, our boards were smooth and flat, but we still had a little more work to do before we could start cutting them into strips.

The original boards were very long, some of them were over 12 feet long, so the next thing I did was use a circular saw and a square to cut the boards into approximate lengths. These cuts definitely wouldn't be square or clean enough to use as final cuts. The goal was simply to cut the material into more manageable sizes. I made sure. To cut each board a little longer than I needed for its final length before I could start cutting each board into slats, I needed to straighten one edge of the board, although they might look quite straight, the outside edges of the boards were actually quite straight. rough and tend to go in and out creating a poor reference to use on a table saw.

You can use what is called a jointer to clean up this edge or if you don't have a jointer like I do, you can use a chain saw or even a circular saw with an edge cutting guide to create a straight line on one edge. If this is your first time watching a pneumatic static video, I want to say welcome, I'm glad you're here, take a second to make sure you get it. subscribe button and bell below that way you never miss one of my diy projects at this point my boards were finally ready to start breaking into strips.
I had played with some 3D models and knew I wanted my deeper wood slats that were wide after planting the faces of my boards. I was left with about an inch and three quarters thick. I set up the fence on my table saw so I could cut the slats into one and a quarter inch wide strips over a couple of hours and after a lot of sawing, I ended up with about 70 different slats. At this point the slats were still roughly in length because I wanted to be able to cut each one into place during installation.
I began the tedious job of starting to sand the four exposed sides of the 70 sheets. Now I'm one of those weirdos who doesn't really mind sanding too much, but I admit that I completely underestimated the amount of work that was going to be involved. I used my orbital sander to sand and sand some more and sand some. Plus, I've been sanding for two days straight, it's taking forever and I'm fed up. I need to find another solution. I'm not even close to finishing and it's taking forever. A couple of days my hands were going numb from the vibration of the sander and I was feeling totally overwhelmed, luckily I belonged to a cool local woodworking group here in Arizona.
I reached out to our Facebook group and asked if anyone had a drum sander and would they let me come use it with my friend Jessie from Kozakski. Customs came to my rescue and allowed us to drive to her Phoenix store and use her drum sander for a few hours. It still took us quite a while to get all four sides of the 70's ribbon smooth, but it was much better than trying to do it. by hand, the last sanding I needed to do was break down the sharp edges of the boards to do this, my favorite technique is to do it by hand, in fact I think it's the quickest way, at this point we were finally ready to finish to keep the poplar as pale and blonde as possible.
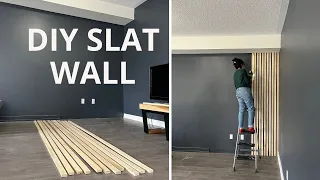
Ideally you would have used a water based finish such as polyacrylic, however one of the disadvantages of water based finishes is the fact that it will raise the grain when applied to rock wood. I was about to hand sand the 70 slats again after the first coat of finish, so I decided to use spray lacquer, although lacquer can slightly yellow blonde wood, it is usually my preferred finish because it is very easy to apply and is self-leveling. and it dries very quickly allowing three or four coats to be applied in just a few hours while the last layer of lacquer was drying on the slats I entered the house and began the preparation work for the installation the idea was to get that acoustic panel look at the rail , I was going to run the slots from the floor to the ceiling.
I started by marking the location on the wall and then started cutting and removing the baseboards, by far my favorite tool for this job is a cordless oscillating tool. multitool I provided links for all the products used in the video description, so be sure to check it out. Once I removed the baseboards in the area I was going to work on, I began laying out my space using a very important tool. Laser Level I applied a good bead of construction adhesive to the back of my first batten and began moving it into place. The construction adhesive will do the most work holding the batten against the wall, but I also drove two and a half where possible. 16-inch finishing nail into the frame behind the wall, as the slats ran lengthwise from floor to ceiling, which meant every slack could be secured to at least the top and bottom plate of the wall, conveniently, this corner of the kitchen is also what's called a shear wall, which meant it had been sheathed with OSB when it was built so you could drive finish nails along the entire length of the battens and They had something more substantial to hold onto besides the drywall.
I found the easiest way. To maintain my space was to use two pieces of scrap block, one the size of my space and one the thickness of my actual slats. After placing the previous slat I would place the two blocks side by side and then use my laser level to determine where the edge of the next slat should be the small portion of the kitchen wall I installed, it was pretty straight forward after I completed it I moved to our room, which was a little more complicated. The wall area I wanted to panel in our room had some more challenging spots like outlets and also a large opening to accommodate the TV.
I'm sure someone could come up with a more elegant solution, but I found that the easiest way to accommodate these openings was to simply cut my boards and create gaps now that this wall had been built differently than the cut-in wall. Our kitchen, was traditionally framed, meaning the studs were 16 inches on center and there was no OSB backing behind the drywall. I changed my finished nails to two and a quarter inches long and continued installing the slats the same way. Likewise, whenever possible, I still nail into the wood framing of the wall, but with this type of application, the construction adhesive really does all the holding.
Finishing nails are only long enough to go through half-inch thick drywall and are really meant to work. Temporarily to hold the batten in place while the construction adhesive sets. If you do not have a finished nailer that can accommodate two-and-a-half-inch-long nails, another option is to use trim-head screws. Trim head screws have a very small head that is not much larger. than a finishing nail, they leave a fairly small hole that is easy to fill with wood filler. Subsequently, screws are also a good option if you have a board that is a little warped and you have to push it into place after the full length side pieces and bottom slats of the panels that would surround the TV were installed.
I started working on the top. I used a traditional level to mark the bottom horizontal line and then my laser level definitely came into play a little more. My laser level is making my life. Much, much easier right now, I love that thing. I have no problems aligning the bottom row slats under the TV with the top row. All I do is place my laser level on the edge of one of the bottom slats and I know exactly where to place the corresponding one on top, after just a couple of hours of work all the wood slats were installed and I could start working on some of the finishing touches.
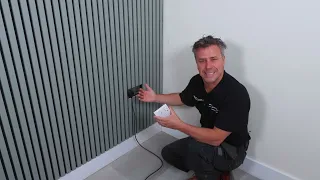
At this point I need to fill in all the little nail holes everywhere. Typically when filling holes in a prefinished wood surface I like to use a pre-stained wood filler. My favorite, the one I usually use, is the one made by Dap. It's called plastic wood. It comes in a lot of different shades and colors. The problem is that with this poplar there are a variety of colors that I need to fill. If I use a single color wood filler, it might match some holes and stand out in others, so for this project I'm using dap premium wood filler.
The nice thing about this is you can dye it to match the exact material you need to fill. You can stain that premium wood filler using a variety of products; For example, in this project I used water-based wood stain and acrylic paint to get four different shades to work with aspen. Another thing I like about premium wood filler is the fact that it cleans up with water and soap, so the way I like to apply it is to rub a small amount of wood putty into the nail hole, wait a few minutes and come. I came back with a damp rag to wipe off the excess once all the nail holes were filled, the last thing I had to do was caulk the outside seams where the battens meet the drywall, apply strips of painter's tape to both sides of the seam helps ensure I get a super sharp, tight putty line.
My favorite product for this type of application is Alex Plus, made with a tap. You've probably seen Alex Plus before because it's the number one selling latex putty in the country. It is a multi-use acrylic latex. Silicone caulk is very flexible and resists cracking and shrinking. I use it to seal almost all the trim and molding in my house once I removed the tape my new grooved walls were complete. I am in love with the look of both walls. but especially in my master bedroom, I know that a big black TV isn't the most beautiful thing to look at on the wall, but having the TV surrounded by these thicker sheets really helps minimize its intrusion, although this is probably one of the most dusty ones I've ever had.
I've done it, it was worth it if you want to see more of the modern DIY house we built. I recommend you see the entire series of modern buildings on a limited budget. If you like other types of DIY content, check out this video too. I know. There are many different ways to approach a
vertical
slat wall like this. If they tried something different, I'd like to know what they used. Be sure to leave a comment below and as always, thanks for watching guys.If you have any copyright issue, please Contact