Making radioactive uranium glass
Feb 18, 2020This video has been sponsored by Brilliant. Sometime last year was the first time I heard about
uranium
glass
and I thought it was a marketing thing or something, but it's actually real. It is notglass
made entirely ofuranium
, but glass containing uranium. I was very interested in this and decided to buy it, and I bought this mug on eBay. Pure uranium glass is normally yellow, but this one is green, and I think that's because they put some iron in it. Regardless, that's not really what makes uranium glass special, and it's what it looks like under a black light.
The uranium it contains fluoresces and gives it a really pretty green color. The actual amount of uranium it contains is quite small, so the glass itself is only slightly
radioactive
. Glassware in general and mugs like this were very popular in the late 19th and early 20th centuries. However, during World War II, the government began confiscating all uranium and diverting it to nuclear research. This wiped out the entire uranium glass industry, until the late 1950s, when some restrictions on uranium were lifted. Some companies startedmaking
it again, but at that time, the health effects of radiation were much better known.
More Interesting Facts About,
making radioactive uranium glass...
Furthermore, after the nuclear bombs, the public perception of uranium was not exactly good. Today, there are apparently still some companies that make it, but I couldn't find anything for sale. As far as I know, if you want to get uranium glass, you can only buy the old stuff. I found all this really interesting and I had wanted to work with uranium for a long time, so I decided to make uranium glass. My original plan was to buy some uranium ore, then refine it and use that purified uranium to put into glass. However, I learned from Cody at Cody'sLab that the government really doesn't like it when you show how to refine uranium on the Internet.

Instead, I had to start with an already purified source and was able to find depleted uranium. This means that it is missing the isotope to do things like generate nuclear power or make nuclear weapons. However, it is still good for
making
glass. Uranyl nitrate is the nitrate salt of uranium and when pure, can form these pretty yellow crystals. In addition to looking pretty, it seems relatively mundane, and that's something I've always found interesting about radiation. As this uranyl nitrate sits there, it shoots out thousands of extremely small particles, but they are too small to see or feel.
There is no way to naturally perceive that it is there, and this was one of the main reasons why it took so long to discover radiation. To know it's there, you have to detect it using some instrument or setup, and many different methods have been developed over the years. Nowadays, one of the easiest ways is to simply use a Geiger counter. But before starting this project, I didn't have one. However, when working with something
radioactive
like uranium, it is absolutely necessary. I looked online and ended up buying this one on Amazon, which wasn't very expensive, but was supposed to be decent.I turned it on and let it stabilize for a minute and saw that the natural background radiation was about 15 cpm. Cpm means counts per minute and is a reading of how many radioactive particles it detects in one minute. Radiation exists everywhere in the environment and you are always being bombarded by it naturally, and this 15 cpm reading is actually quite low. It was time to test it with uranium, so I put it next to it. There was clearly an effect, and this Geiger counter was going to be more than usable for this project, but unfortunately it wasn't going to be super accurate.
This was because most of the radiation given off by uranium is in the form of something called alpha particles, and this counter is not even capable of detecting them. It is only capable of capturing the beta and gamma rays it emits, which are significantly smaller than the alpha rays. Despite this, it will still be very useful because I don't really need a super accurate reading. I just have to know if it's there or not. Before we start, I just wanted to try something else. Uranyl nitrate was supposed to fluoresce under UV rays, so I put some on a plate, turned off the lights, and photographed it with my black light.
It was definitely fluorescent. This got me thinking that maybe to make uranium glass, I could just drop the uranyl nitrate directly into a molten glass. However, when I looked it up, it didn't seem like that was the case. I could barely find anything about uranium glass manufacturing in general, but out of all the information I found, it always mentioned the use of something called sodium diuranate. Based on this and considering the fact that I had never made uranium glass before, I thought it would probably be best for me to use it as well. This meant that the project was going to be a little more fun because I would have to do some uranium chemistry to convert urinol nitrate to sodium diuranate.
To start, I had to add the uranyl nitrate to a beaker and normally I would have just quickly waited on a piece of paper and then dumped it in. However, this time, I was working with a uranium compound, so I had to be much more careful. This is because the dust that could be released is not only radioactive, but it is also toxic and can cause heavy metal poisoning. To be as safe as possible, I carefully weighed everything directly into the beaker and in total used about 15 grams. Then on top of this I put a magnetic stir bar and poured in some water, which should have been enough to dissolve all the uranyl nitrate.
I turned on the shaker and waited for it all to go away, but unfortunately it ended up being a little cloudy. I tried adding a little more water in case there wasn't enough, but it didn't seem to do much. This was unfortunate because it now meant I had to clean things up a bit and I really didn't want to have to work with a uranium solution. Fortunately, however, cleaning it wasn't exactly going to be very difficult and I only had to do a quick leak. I did this by passing it through a little cotton and a little sea light, which is like super fine sand.
The material that passes initially tends to be a little cloudy, so I let it run for a while, then swapped it for a new beaker and ran the rest of the material again. After this, it was perfectly nice and clear, but there was still a lot of uranium solution all over the funnel and on the cotton and sea light, so I washed it off with a little water. When all the water finally passed, I removed the funnel and the solution was practically ready. To convert this to sodium diurinate, I had to react it with something called sodium hydroxide.
This is also known as lye and is often sold as drain cleaner, and that's where I get all of mine from. For this reaction, you also had to dissolve everything in water, but the exact concentration didn't really matter. I thought about 30% by weight would probably be good, so I measured out about 70 milliliters of water and poured in about 30 grams. Everything dissolves relatively easily in water, but it also generates a lot of heat, so the solution is usually quite hot in the end. However, I wanted it to be closer to room temperature or maybe a little warm, so I put it in the refrigerator to cool.
When I felt it was good, I took it out of the refrigerator and started slowly adding it to the uranyl nitrate. Almost immediately, these strange solid things that looked like donuts started forming, and this was all sodium diuranate. The reason this happened was because unlike uranyl nitrate and sodium hydroxide, sodium diuranate is practically insoluble in water, so the moment it was formed, it separated. What I had to do now was basically keep adding sodium hydroxide until it stopped producing diuranate. At this point, it was still pretty simple because the solution was nice and clear, and it was really obvious to see.
However, I eventually started stirring it and it all got a little cloudy, so I couldn't rely on just looking at it. Instead, to know when it was ready, I had to keep testing the pH. I did this using some cheap pH papers and kept adding hydroxide until it turned blue, which told me the pH was about 10. After this, I let it sit there for a moment to make sure everything was completely. he reacted and then I filtered it. I simply did this by pouring it through a simple coffee filter, and when most of the water passed through, I washed it several times with distilled water.
Then I let it sit there until all the water was gone too. Now I had some relatively clean sodium diuranate. It was still all wet and sticky, and I would have to dry it, but it would take forever to sit there in the strainer. With other chemicals, I would usually just put a fan on the side to help speed things up, but that would probably end up blowing a small amount of dust into the air, and I didn't really feel comfortable doing that with uranium. . Instead, I carefully removed the coffee filter, put it in a container, and vacuumed it.
In a vacuum, the water vaporizes much more and this makes it dry much faster. In a closed space, like this vacuum chamber, water vapor has nowhere to go. To solve this problem, I included a bunch of dry salt in the bottom, which would constantly collect water vapor. I took it out about five hours later and it was almost dry. I purposely didn't let it dry completely because I wanted to avoid as much dust as possible. By keeping it slightly moist and a little doughy, I was able to scrape it all off quite safely, without forming deadly clouds.
Also, in addition to the safety issue, I was worried that if I let it dry completely, it would stick to the paper and be impossible to separate. I was able to take most of it and put it in a small bottle, but there was still some stuck to the paper. Getting the latter was a lot more sloppy than I wanted, but I didn't really have any choice. I just did my best to scrape it all off, and then everything that even remotely came into contact with the uranium was put into a special waste container. Everything I took out I transferred into the same small bottle, and I did it as carefully as I could, but it was still a little messy.
There was a little bit of uranium that managed to get out of the bottle and I, of course, had to clean it up. I did this by simply wiping it down a few times with a damp paper towel. With all the uranium safely in the bottle, and none of it on the outside that would poison me when I touched it, I was ready to finish drying it. To do this, I put it in the same vacuum chamber I used before and gave it a very strong vacuum. I wanted it to be as absolutely dry as possible, so I left it there for 3 or 4 days.
I went back to it a few days later, repressurized the camera and took it out. It worked. It was really dry. When it's dry like this, it tends to give off dust and dust, which is obviously really horrible to breathe. That's why I just dried it completely in the final container I was storing it in, so I wouldn't have to move or handle it. I went ahead and weighed what I had here, and it turned out that they weighed 9 grams, which was about what I expected. Just for fun, I decided to test it with the Geiger counter and you can see that the glass was able to block most of the radiation.
The reading I had was just above the normal background level, but that totally changed when I moved it up. The reason this happened was that most of the radiation emitted here was in the form of alpha and beta particles, and they simply couldn't get through the glass. As I mentioned before, this counter is not capable of picking up alpha particles in general. What you were seeing here was probably coming mostly from beta particles. Another thing I wanted to try was applying UV rays to it and I was surprised that it didn't fluoresce. Maybe it was fluorescent and super faint, but from what I could see, it was pretty dead.
I thought this was really interesting because logically you would assume that if you wanted to make glass fluorescent, you would put something fluorescent on it. However, I guess that's not the case and glass chemistry is a little more complicated than I thought. But anyway, now that I had the sodium diuranate, I could start trying to make the glass. However, I had never made glass before, so I had no idea how to do it. I looked online and one of the best things I found was a video by Ben, who runs the Applied Science channel. He gave a lot of good details and advice, and almost everything I will do here is based on what I learned from him.
I also got some advice from Andy, who runs the channel called How to Do Everything. When it comes to making glass, it is not very simple and there are many different ingredients that can be used. For beginners, Ben simply recommended using a mixture of three different things: silica, sodium carbonate, and boric acid. That's what I chose, and all of these ingredients were very easy to get, and I ordered them all on Amazon. Then I took a jar, added 60 grams of each and shook it to mix it up a little. This way,would probably work for making glass, but the powder was still too clumpy in my opinion.
To fix this, I put everything in a blender and let it run for a few minutes. Apparently this worked pretty well, and after this, it was a super fine powder and looked like flour. It was definitely much better than before and I was hoping it would give me a better quality glass. Before adding uranium to it, it was a good idea to test it to make sure it worked. I had never made glass before and it was probably a good idea to get at least some experience doing it before trying it with uranium. The general idea behind making glass was very simple and all you had to do was melt this powder.
I added a bunch to this dish I had, which was normally used to melt things like gold, and put it in a small oven. From the fact that it was glowing orange, it was obviously quite hot and I had set it to around 1,100°C. I wasn't entirely sure it was hot enough to melt, but when I checked it a few minutes later, it seemed to be working. Since there was more space on the plate, I decided to add a little more glass. At this high temperature, the sodium carbonate was almost melting, but the boric acid was decomposing into boron trioxide and water vapor.
This caused it to bubble a little, and you can see it if you look very closely. The main purpose of these chemicals was that they both had much lower melting points than silica and helped lower the overall melting point of the mixture. Pure silica only starts to melt around 1700°C, but at that point, it is still too thick to work with and needs to be reached above 2000°C. In general, achieving such a high temperature is very difficult and, because of this, additives are almost always included to lower the melting point. In my case, when using boron trioxide, the end result would be some borosilicate glass.
In general, borosilicate glass is much less sensitive to large temperature changes and I was hoping this would help prevent the glass from cracking as it cools. But anyway I let it sit like that for about 30 minutes and waited for it to completely liquefy. When it finally looked like it was ready, I used a blowtorch to preheat a square of graphite. Then I carefully removed the dish from the oven and poured the entire glass. I let it cool for the next 15 or 20 minutes and it looked pretty decent. It looked like a normal piece of glass and I was actually very proud of it.
I really thought it would break, but apparently it didn't, and I was still a little skeptical about it. I left it overnight to see if anything changed and the next day it was still totally fine. From what I could see, this glass mixture worked quite well and the process seemed relatively simple. After doing it just once, I was definitely not a pro at glass making, but I felt like I was ready to get uranium involved. To do this, I only had to add a little uranium to the glass mixture, but it was still too lumpy. If you added it like this, it wouldn't mix properly and the glass would be very uneven.
Until now, he had done everything he could to avoid working with uranium powder, but unfortunately he had no choice. I just did my best to grind it very carefully and try to create as little dust as possible. When I was done, I put it all back in the bottle and threw anything that came into contact with the uranium into my waste container. To add it to the glass mixture, the amount of uranium needed was very small. However, I didn't know exactly how much to add because, from what I found online, some recipes use as little as 0.1% uranium and others as much as 3%.
All of this concentration was done by weight and I decided to use a moderate 0.25%. I figured this way, if the final glass didn't shine well, I could add a little more. At 0.25% it was barely necessary and for what I had here I only had to add 0.4 grams. To mix it, I shook it for several minutes and when I was done, it looked the same as it did before the uranium. From what I could see, it was still very white, and I guess there just wasn't enough of it to noticeably change the color. The dish from before was already in the oven, and I started loading it with a few spoonfuls.
I waited for all of this to melt, then added a little more and left it there for about half an hour. Also, as a safety precaution, all of this was done in my fume hood in case it released uranium fumes. In reality, there probably wasn't much or any of that, but it was obviously something I had to be very careful with. When I checked it and it looked ready, I preheated that block of graphite again. I then took out the plate and poured in what was hopefully uranium glass. While it was still red hot, it was hard to tell, but as it cooled, this time it definitely had color.
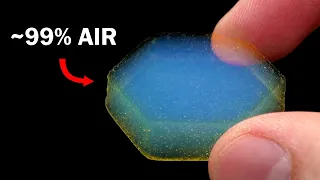
It also shrank a bit, and when I felt it was solid enough to move, I picked it up and put it on some glass insulation. With a white background, the color was much easier to see and was a very pretty, bright yellow. This was exactly what I expected it to be, and so far, things seemed to be going pretty well. The next thing to do was test and see if it was fluorescent. I took out my UV lamp, turned it on and it was working. The glass was definitely a little green, but it wasn't very impressive to say the least.
My first assumption from this was that 0.25% was simply not enough uranium. However, then I thought, maybe it was still too hot and I had to wait for it to cool down. I decided to be a little patient and try it again a few minutes later. This time, it still wasn't amazing, but it was certainly better than before. I then let it cool completely to room temperature before testing it again, and this time it worked great. The 0.25% uranium I used was apparently more than enough and I guess I wouldn't have to add anything extra. There was still some glass left on the plate, so I poured that out too and made another little flat glass thing.
This one also worked great once it was at room temperature and glowed really well under UV rays. After doing this, it was getting late so I had to drop everything and come back in the morning. Unfortunately, when I checked the glass, one of them had spontaneously broken. These pieces were much larger than in the first test and it looked like this could cause some problems. One of them was still fine, and I thought that maybe the fact that only one of them broke was just a matter of bad luck. Then, almost as if he somehow knew what I was thinking, he responded by splitting in half just as he was sitting in front of me.
This was completely random, so unfortunately I didn't see it on camera, but it made it clear to me that there was a problem. This was because it had cooled the glass quickly and unevenly, and that had caused a lot of internal stress. What I thought might work to fix this problem was to simply insulate the glass and cool it very slowly. The end result would still be under high stress, but I hoped it would reduce it enough that it would stop spontaneously falling apart. For this one, I also decided to try to make it much larger and carried a lot more glass.
Then I poured it all out and, by the time it looks solid enough, I put it between some insulation. After that I moved it to one of my benches to cool and at first it seemed to be working fine. However, a few hours later, I heard the sound of glass breaking and this is what I came back to. A lot of stress had clearly built up, and apparently it was enough to shoot off a couple of centimeters. The pieces that survived didn't seem too fragile, at least when I hit them. Surprisingly though, in the heat they probably would have exploded.
I decided to try breaking off a chunk with pliers and it was surprisingly difficult. The moment it broke, he just exploded from all that internal stress. I thought this was really cool, but what I didn't like was all the uranium glass dust flying everywhere. After doing this, I realized my only real option was to temper it. To do this, you would have to keep the glass at about 450°C for several hours. At this temperature, the glass is solid, but still liquid enough that its atoms can move. This happens very slowly, so it takes several hours, but it allows them to move to new positions and reduce overall internal stress.
This is the right way to do things, and it's what I ideally would have done before, but I was trying to avoid it because I only had one oven. This makes it much harder and slower to get things done, but I thought I'd give it a try. I still really wanted to make a big disk, so I melted the rest of the powder I had and poured another one. Then, while it was cooling, I quickly changed the oven temperature to 450°C and put it in there. Overcooking this would take at least several hours and I planned to leave it overnight.
Meanwhile I collected all the broken glass I had, and since I didn't have an oven now, I melted them with a blowtorch. What I wanted to try here was blowing glass with it, but I had no idea what I was doing and it was a total failure. Instead, I simply made several beads that I thought were small enough that I could get them out without overcooking them. However, at the last minute, I had the brilliant idea of tempering them just in case. I knew it was a bad idea to open the oven, but I did it anyway, and it was, well, a bad idea.
I tried to put it in quickly, but when the glass touched the disc, a crack started to form. Then I tried to move it to get a better look and cracks formed everywhere I touched. I actually thought this was cool, but now I was worried that it would end up exploding again. I took it out and blew on it with a blowtorch to heat it up again and melt the surface. This way, he hoped that even if there were cracks, if he sealed the top, he could prevent it from falling apart. After this, I put it back in the oven and let everything bake overnight.
The next day, I was worried I would open it and see a mess, but it turned out fine. At first I was a little disappointed that the large piece cracked so much, but in the end I liked it. I think having it like that made it a little more interesting. I think the small beads I made turned out really well too and none of them were broken or crumbled. The question I had now was how radioactive were these pieces of glass? Considering the amount of uranium I put in, it was definitely pretty low, but I still wanted to try it.
The Geiger counter I had was not the best for this and I decided to invest in a better one. This one is much more sensitive and has a larger detection area, and can also detect alpha particles. To test it I did it with the largest piece, and with the uranium concentration of only 0.25% I assumed the reading would be really low. However, it was more than I got with the pure uranyl nitrate because now I was actually seeing the alpha particles. The detector also had a completely different shape and a much larger surface area, allowing it to capture many more particles.
As a unit, cpm only shows the strict number of particles it detects and does not differentiate between things like alpha, beta or gamma. This is important when trying to judge how dangerous a radioactive source is because not all radioactive sources are created equal. For this reason, it is sometimes better to opt for a different unit such as Sieverts, which will take this into account. In micro Sieverts per hour, this gave a reading of approximately 5.5. According to this, which I got from the Canadian Nuclear Association, it means that if you rest your cheek against it, it would be like getting a dental x-ray every two hours.
For one of the accounts, I got that it was only about 1.3 micro Sieverts per hour, and this was simply because it was much smaller. In any case, at this level of radiation, it is generally safe to have this glass on hand and handle it occasionally. However, it would be a very bad idea to fill your pockets with them or something and carry them around all the time. It might be okay to wear it occasionally as a necklace or something for a short period of time, but I don't think that's the best idea. In a somewhat recent video, I said that I wasn't really going to do sponsorships anymore, and it was mostly because I didn't feel comfortable doing them.
One of my biggest problems was that I didn't like being told what to say or covering specific marketing topics or buzzwords. Even I would never promote something I didn't really like, I just didn't like this part very much. I decided I would start making them again if I could have almost complete freedom over them. When I came up with this idea, I honestly didn't think anyone would do this. But to my surprise, Brilliant approached me and they did exactly that. Before this, I had never heard of Brilliant, but I've been using it for about a week and I really like it.
I use it primarily on my phone, but it's also available on computer by simply going to their website, shiny.org. They offer a ton of mini-courses on topics like math, physics, chemistry, and computer science, and they do it in a way that I think is really fun. This is because they take a different, more active approach to learning which makes it feel much more like a game. They cover many of thefundamentals, and I have focused mainly on physics, because physics has always been a big gap in my knowledge. What I also like is that it is very easy to start and stop, because it is divided into many small sections.
I usually don't have a lot of time to do things, but I still make progress, even when I do it randomly for several minutes at a time. But with all that said, if you're interested in learning something new, you should definitely check out Brilliant. They offer a free version, which you can try first and then if you like it, you can sign up for the premium one, which has a lot more stuff and a lot more features. Also, if you decide to go Premium, you need to sign up using my link, which is shiny.org/NileRed, because they offer a 20% discount to the first 200 people who use it.
But anyway, I hope you enjoyed the video and I'll see you in the next one. As always, thank you very much to all my followers on Patreon. All who supportI can watch my videos at least 24 hours before posting them on YouTube. Also, everyone on Patreon can message me directly. If you support me with $5 or more, you'll get your name at the end like you see here.
If you have any copyright issue, please Contact