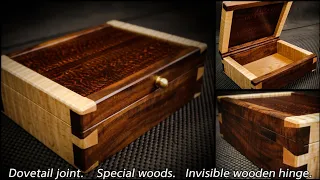
Making Abe Lincoln's Mystery Mallet! // "IMPOSSIBLE" Woodworking Joinery
Feb 27, 2020Hello everyone, how are you doing? My name is Chris and this is my Oats store partner and in this video I'm going to show you how I built this
impossible
dovetail deck. Now, legend says that Abraham Lincoln designed thismallet
back in the day because he wanted to devise a way to make amallet
that had a head that would never come loose or slide off the handle. Now the problem with these tapered dovetails is that it also makes itimpossible
to put that Mellet on the handle, so there are some tricks to It's really cool, it's really challenging, a lot of hand cutjoinery
on this one and I had a good time, so I'll show you exactly what I did to make this deck.
It should be a lot of fun, so let's get started first. What I'm going to do is take some raw hickory and hickory and size them down to the sizes I want. Once the piece of walnut I'll be using for the head is square, I'll make the walnut handle piece the exact same thickness as the head. Now I first learned about this deck a couple of years ago on my favorite TV show of all time. The
woodworking
shop was just down the Hill and building one has been on my to-do list ever since, where I also wrote an article in Popular Woodworking magazine. about the mallet and explains that legend has it that Abraham Lincoln created a similar mallet with these tapered dovetails that would forever prevent the head of a mallet from flying off the handle.
More Interesting Facts About,
making abe lincoln s mystery mallet impossible woodworking joinery...
The problem is that the same carpentry also makes it impossible to assemble, but as you will see. You'll see later, there are some pretty clever things that make this mell possible, then you move on to the meticulous task of precisely laying out all the
joinery
into something like this, where I want extreme precision, I'm going to use a marking gauge or a knife. Doing all my lines instead of using a Royce pencil mallet was really cool, but looking at its dimensions, there were a couple things I wanted to change first. I wanted to make the head of the mallet wider and heavier than his, which also meant I could start with the thicker handle and allows me to make the handle have more flare where it meets the head because of this change, I couldn't use none of theirwoodworking
measurements and I had to figure it out on my own, but to be honest, that's One of my favorite parts of woodworking is actually designing and figuring out woodworking, so I really enjoyed that you can start to see here on the bottom of the mallet head that the dovetails are not only tapered but also ramped, almost touching the center mortise. at the bottom, this and how the dovetail is cut.
The tenons on the handle are the key to assembling the mallet and you will see this later. Hey everyone, if you enjoyed this video, consider subscribing to the channel, but be sure to hit that too. Bell notification button so you get alerts when I post other really interesting videos like this YouTube will no longer alert you if I post a new video if you don't have the Bell icon, tick and also feel free to follow me on Instagram. where I post a lot of stuff about the middle of the project and behind the scenes if you want to help support the channel even more.

I have marketing plans on my website for sale or there is also patreon if you want to help me continue doing this. The videos that way, the links to all of that are in the description and again I want to thank everyone for all the support that they give. One of the hardest parts of this project was figuring out the joinery of the handle. I wanted to leave the tenants proud of the gavel. head and this caused some problems. I needed to take measurements of where the top of the mallet would meet those tenons and then extend those lines to where the end of the proud tenons would be, but because they are tapered dovetails, they continue to widen beyond the top of the mallet and then they wouldn't fit through that Tennant opening, that dovetail mortise opening, so I needed to know where I had to cut them so they wouldn't fit through, needless to say it took a little head scratching and having A set of calipers really helped make sure everything was right and here is the real key to
making
this union possible.You have to cut curved sections on the tenons to fit so they bend and you can tighten. Bring them together to insert the handle into the head of the mallet. The biggest challenge with this project is that you can't test the fit of your joinery first, you have to rely completely on your precision and craftsmanship because once you assemble the mallet, it doesn't come back apart to start. handle on the head, I need to tighten the tips so they can start on that ramped part of the sliding dovetails and as the handle goes into the outer dovetail, the Tenon will follow those ramps and slowly straighten out now due a Due to the tremendous amount of force and pressure on the two components during assembly, it is vital to hold the head firmly in a vise and also hold the handle in a couple of points so that they do not break during assembly if Press too hard on your joinery, its head will explode or one of the tenons will break.
I've seen pictures of both, it's terrible and because this is a lot of fancy exposed woodwork, you don't want to cut everything too loose because the gaps are really sticking out like a sore thumb, but if you do everything right, all the pressure will be released. just when it sets and your joint will look amazing. Here, via Tenon, we are tightening the screw on my vise before they can fully seat. I took enough pressure off that vise to lift it up enough to finish seeing the handle. I was still worried that everything might explode at this point so I didn't want to take any risks, so I'm really happy with how this turned out.
I'm very impressed. My carpentry worked very well. What happened here in the middle is when I was driving that and these and these Tenons weren't pinched, you know, they got pinched at the end, but they're still straight. at the base and they're like round and they bend up here what was happening I realized when I was putting it in was the bottom corner of this bottom opening in the head the dovetail heads can be hard to explain I was digging into this edge on the outside of the tang and compressed those fibers and that's what's actually causing the gap.
There was a gap on each side and it got really bad here where it basically pushed into this corner on the edge of this tenon on each side. I took some steaming hot water and rinsed it in there and spread some wood fiber out, but I can't complain. What I should have done was dilute these two Tenons a little more so they would really compress, but this Hickory is so hard, strong, and rigid that it didn't flex at all. I was very afraid of breaking them. It's a delicate dance to have them thick enough. I know Roy Underhill frames are thinner and by doing so.
You have thinner tenants here and they have less to bend, which is probably the first time I've done it. I'm very, very happy because, like I said, there's no test that fits this, you just have to do your best. You can design it as precisely as possible and hope for the best. Hello everyone, I'm in my friend Tom's store, it's a beautiful dream store and we're going to make some changes now if you remember about two years ago. The time I turned I turned these beautiful mallets and guess what I'm back here again
making
another mallet, but let's jump on the lathe, we're going to trace the shape of the handle and we'll start spinning.Wow, that absolutely looks. Incredible, it's nice. Wow, well, everyone I hope you enjoyed this video. I know I really had a great time making this deck. I love doing projects like this that challenge me and make me a better woodworker and I hope I've made old Honest Abe and Roy proud. with this project, thank you very much again for watching and we will see it in the next video.
If you have any copyright issue, please Contact