Making a Motorised Go Cart with NO WELDER and simple tools #1 - Chassis/Engine
Feb 22, 2020now not everyone is as lucky as me to have such a well equipped workshop we have bad SARS we have blades we have many machines we have
welder
s but they are all considered exotic machines but twelve years ago I never sang Iver but I still wanted to make him do interesting things like Adi now I just I wasn't quite sure how to do it and where to start, so this project is for you who are in exactly the same position as me. Now we are going to make a kart. because everyone wants to make go-karts and it's a lot of fun and the product to get to, but I'm not going to use any of this flash stuff, don't forget, the bandsawwelder
I'm not going to get used to, I'm just going to use realsimple
things you probably already have in your garden shed.
Yes, let's get started, but we will need a few things to make this go-kart. Now I have a pit bike
engine
. I like these, they are nice and small, quite powerful and we have. some cut chunks and bobs here of course then if used to boil this brand it will set you back around six hundred quid which for some people is massively over budget but if you look second hand you can get some this for a fairly low price. a second hand Pip Boy and of course you get almost half of everything, everything taken care of, theengine
chain sprocket and things like that and then obviously the kart base, there are plenty on eBay, just go and take a look now if you want.
More Interesting Facts About,
making a motorised go cart with no welder and simple tools 1 chassis engine...
I bought these exact parts. I have all this at a store called pit bike parts. They know exactly what I have for this video. Some of them are not on their website so give them a call and then they can tell you. I'll tell you what I've had if you want it, you can buy it, obviously, you know what
tools
are used, when, for the project, well, you need to drill an angle grinder, which is an essential file to tie to the edges, a collection of keys going upwards. to nineteen milk placed around wrenches, drill bits, obviously, but then like normal things, like hammers, screwdrivers, SRVs, you know, anybody has a tool, kids can have all that kind of junk, the two things you're probably going to have What to get especially is a 20 mil metal drill bit and a 25 mil bi-metal hole saw to air drill the holes for the axles and okay, that drill bit is covered now, the other bits that you potentially don't need would be much better. a square and a set of clamps will make your life a lot easier right now, the materials will make this spring basically a bit for every box section, several different types of flat bar and a bit of 12/ 12/12 25 minutes underlined, well, that's all we're going to need.
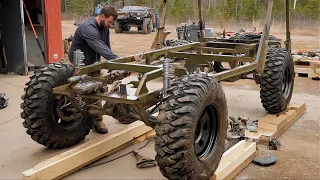
Ok, get started, you now have the rear axle set up. Basically what we've done is joined together three parts of the box section, we're just using plates. that go on top, it would be better if you also placed a plate underneath, but I'm looking at this through the eyes of a cheapskate who doesn't have much metal. Now, a couple of little tips when cutting out the box section. Instead of just trying to cut it all at once, as precision will help you, it's good to mark each edge and then cut them individually and turn the mouth so you don't go off track and do the same when you drill.

Also on the holes, sometimes it is better to mark the top parts of the box section and that the other sides are the two holes that definitely meet because, as you know, humans have a tendency to not hold the drill at perfect angles 90 degrees and down. so you may end up with the bottom hole not being in the top one especially if you can use two plates which will cause your problems now that you have a rear axle the sprocket position is fixed so we can't do nothing about it. the disc brake, which floats in some kind of keyway, sits there, that will work fine.
Next we need to do the front axle, now the rear axle just sticks out straight, but that's not the case on the front. because the stubby little steering axles are sitting at an angle and if you can see that very well on the camera now, if we put it on a straight part, the front wheel would end up crooked, as it would look. a little rubbish, so we have to bend our frame up, which straightens the wheel out, but it doesn't matter, I have a plan, I love you until the music has to be lost. No, so that's the main part of The
chassis
is done now a little bit across the border, we basically cut some big chunks out of the two by two box section, angled one of the sides of the cuts so we could bend it up and then obviously that meets the angles on the front wheel. nanny and then we put these little plates here to close the gap and give it a little extra strength and as you can see there's no flex or anything like that, it's pretty good now I also cut these little slots here and In addition to allowing the wheel turn because the thing would ruin it, it also acts as a steering stop, so you can't work on everything and get everything dirty now that these pieces are sticking out like eggs.I'm probably going to put a bar in the front, if I hit something the wheels won't take it all over the steering system, but I think the next job is to mount the engine, now I mainly want to go karts, use those as lawnmowers . derived motors and they sit right on top of the axle which is great because there is a lot of space around them, the chain drive comes straight out of their strands which have a little automatic click, all good but they are not as powerful as they sound. lawn mowers and they don't have gears so as you know I like to use these pit bike motors but there's a reason for that, they're pretty cheap, have a reasonable amount of power and they also come in a few configurations now. one is semi-automatic, which basically means it has four gears but no clutch.
The clutch engages in the shifter, so when you push the shifter, it sort of depresses the clutch and then puts the gear into line and something like that. The last stage of that now, as far as mounting it, it's a little bit different than the lawnmowers because it can't sit exactly on top of the axle, but there is a workaround, so what we're going to do, we're going to glue some on. bars, these little brown dots on the drill are for mounting points. I'm going to put a bar there and then another bar down here that can come off of these attachment points on the side here and then we'll put it as far back as possible. as much as possible, so it'll almost be above the axle, but just the sprocket, most of the motor will sit a little bit further forward, but you know, I think that's a better option, so we'll sit up there.
The little bar things here now because they're pretty powerful. I have talked a lot about them to strengthen the bar. The little plate on the side to give it an angle because I've built it there before as a little test. to see if it could run and at full revs this actually bent because the motor wanted to go really low towards the sprocket and that's going to sit there like this and then we're going to get another part that was sitting in the front and then this is going to sit here? you know mr. Put the sprocket that's nearby, one might go there and then the chain will obviously go down and then the best thing about this is if you want to tension the chain, we're not going to do any complex sliding system.
What you do is you just lift these bars up so basically you just put washers and packers and stuff underneath and then that will attach the trainer so we might as well stick with that because there's a wonderful solution here and we haven't used the welder yet. I didn't even think about it, rights videos about 10 minutes so I'd say that's enough for the first part. We have a good solid engine. We have a good solid framework. Jobs to do. Obviously, finish it off. Address. Brakes. Throttle. Fuel. Electricity. All that. nonsense, but about a word with mom and she said we're fine, see you in the next part, it looks good, I would say yes.
If you have any copyright issue, please Contact