How To Transfer A Picture To Wood
Feb 20, 2020hey guys it's glass welcome back to my channel today we're going to do a
wood
transfer
so we're going to take this photo and we're going totransfer
it to thiswood
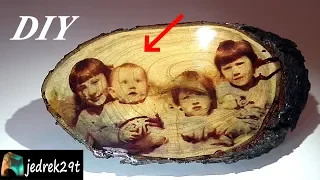
so what we've done is you're going to take whatever. Image that you are going to use and you want to print it in Sinister, it is possible, so this is just printer paper if you don't have this as inkjet from an inkjet printer, if you can do it in black and white, whatever color you want . what to do if you don't have a printer, you can go to Staples Kinkos, anything like that, just ask them to pray on this paper as thin as possible.
I used to do them on canvas, you could do this on campus wood, it was several years ago now, but so this is what we're going to need. I planned two of these in case something happened. I have a backup, so what are we going to do, yeah, and then I have my piece of wood now if you don't have scrap. There is wood around the house and my husband just sanded it for me. If you don't have scrap wood lying around, you can always get a Lowe's Home Depot and have them pick up a little piece, so this project here is just a couple. dollars and you would make a great wedding gift, so this is from my cousin's wedding that I recently talked about, okay, it's super cute and by the way, this
picture
is upside down, so what you'll need is your wood, your photo.
More Interesting Facts About,
how to transfer a picture to wood...
You'll need some modge podge or you can use medium gel, but you'll also need the Marsh bars to go over it now that I've got it dishwasher safe, it'll work the same and that's what I'll use, but if you want. a matte finish or any type of finish then you're going to want to get those out there most of the bond parts are like a vintage finish or like I said you can do the medium gel first and then the bulk of it on top of the work and I I'll show you if you just have mount what you can do right and then you'll need a foam brush and if you have a wider one, whatever size you want to do to cover more area at once, but this is what I have and then every time Until this day comes, we will need to smooth out any type of bubbles, so what I am going to use is some kind of roller.

I have this one and I also have this one from Ranger and I also have this one here from Cricket, so it's going to cover a lot more surface area, so just kind of a rotating brush. If you have one, if not, you can use an old credit card gift card. These are like the illustrated faith cards used for bottle journaling. something like this to help smooth it out, so the first thing we're going to do is we already have our wood ready to go, we saw that we've sanded ours just to make it a lot smoother.

I don't have to do that unless the wood is super rough, but like I said, my husband just sanded this. I'm not worried about this knot here. Somehow I left my
picture
and found out that I think it's I'll be back here on the back of the dress of him. I think they will be good words. She acts now. You can take and you'll want to trim any excess like this white right here whenever you have your photo if you need to trim it. you want to do that before, so you're going to calculate the size of your wood and things like that.You can also do this on tile, it doesn't have to be wood, you can do it on tile, whatever you want, so I'm going to go ahead and cut this out and we'll be right back, so today I have this all cut out, all I did was remove the remaining little pieces of white like that every time we transfer this. I don't have that left on the wood, so what we're going to do is move the wood out of the way for a second, so we're going to take our photo here and what I'm going to do is I'm going to shake my mosh mosh real good, so what I'm going to do is make me a small pile.
You can even take this whole top off here and dip your brush in it if that's what you want. you want to do or you can make a little pile and just dip it into that, that's what I'm going to do and you want to cover this with a nice thick layer, so I'm going to apply a little bit with my brush here and I'm going to start and put this here, so once you understand that, the next thing you're going to do is put your photo here. I'm going to pick this up and I'm going to go ahead and clean this area, okay, I got wet.
I'm going to take my photo here and very carefully put it here, just trying to make sure that I can really do it like this, so what are we going to do? What I'm going to do is I'm just going to lower all of this down and I really feel like I didn't get enough, but we'll find out here in a moment, so what am I going to do with the remaining air bubbles? Go like this and really smooth this out, this really helps. I've tried so many different ways and these rollers are amazing and right now if it's March, well I mean it's April 4th.
I think these are right here. They're on clearance at Hobby Lobby for about $2, but they're pretty affordable anyway, this cricket one I'll also have a link to below. I think it's about five dollars, it wasn't that bad. link it below in case I like it because it's pretty big but I think you can get them at screen printing like Hobby Lobby and stuff too but it's definitely worth the investment so once you have it and it looks like you don't have bubbles. so I'm going to do this so I can see it that way. I think it all looks pretty good, just making sure it's pushed down nicely, just pushing that image into the wood and that's good, so it looks good to me, once you have it.
So, you'll put it aside overnight, so now it's around two in the afternoon. I'm back at it. I can come back to it this afternoon, you know, this afternoon or because I really want it to set for at least eight to twelve hours, but what I normally do is set this up and do it again the next morning, so I just set it during the overnight, let it sit and you can remove the remaining blue this way. I have to not just put it on the wood and I'll come back and then we'll finish the next step.
Okay, so I have this game overnight, so I did this yesterday around two o'clock, it's around nine. morning clock so I let it sit overnight so what I'm going to do now is you can see it's completely dry and I'm going to take a damp cloth and I'm just going to wet this so I touch this. it came out a little bit, but it left just a little bit of water here enough to get this wet, so that's what I'm going to do now is get it really wet, okay, so once you feel like you've got it wet enough, then you're going to take the cloth you want to use.
I like an old rag for this, it'll get a little sticky and stuff, so what you're going to do is start at some point and start rubbing. I don't want to rub too hard, just enough to peel off the paper and what I like to do when you start getting paper like this, I get another spot and they just move and then I'm just going to keep rubbing until I get all this paper off, it's okay, now we have all the offices here and you will see that when it starts to dry out a little bit it will look a little white here and there, but once you put your mom's pots in here, you won't see that anymore, so what you can do is like I said, I printed this twice, what I can always do is go back so I can see that these things here are my clouds, so I can say that, like I said, this is backwards, so it's actually like this, obviously there are clouds up here and they have to make the target and I can look around.
I've got a little spot here that's kind of peeling off and then Right here and this knot, I've got some pieces that you know aren't going to come out, but I think it's okay, a little spot here that looks like it's stuck and then this bar of here, as if it has been cured, but this is it. like the best one I think I've ever had to come out and it was the smoothest and I honestly think it has to do with the use of the rollers because normally sometimes it bubbles up and that's where your image breaks up and you'll have like little holes and stuff, so I recommend using one of these, like I said they are super affordable.
You can find them where the screen printing stuff is half like this crooked link below because it's super affordable and I'll look into it. and I try to link this Ranger from Amazon or something just so they are down, but I think that has something to do with it and then instead of using the medium matte, which I think is super thick, I use the modge podge and I think which worked well, this one is dishwasher safe. I don't know if it's necessarily necessary to use this one because I've used a simple Marsh product before, but I will say it's the best I've ever tried and it was dishwasher safe, this was from Hobby Lobby for $7.99 and I used a discount coupon from the 40%.
Just look for the little dishwasher on top here if they don't have it, where they normally, like all the glues and adhesives, are at Hobby Lobby. The ending counts because sometimes I found it on the cover. I think Walmart has it too, you just have to check your local heater, so the next step you're going to do once you officially have it and you feel like all the paper is off, what you're going to do is clean it again with a clean Walsh rag and make sure all that paper is off, so what I'm going to do is get another clean rag, but in the meantime.
I'm going to talk about this real quick, so you'll see that because I have this video moving fast, I'm going to stop it. I was cleaning my surface because you're going to have all these little pieces of paper everywhere so everyone can do it. Well, I'm going to stop cleaning them again because you're going to have a lot of paper buildup, but you'll see that I was constantly turning my wash rag away from the paper, so it was a new piece and you just want to clean it up. and carefully remove that paper and keep it moist because as you work on an area this can start to dry out so you'll want to see when I wring out the rag and put a little more moisture on it but like I said you can start to see this is getting drawing a little bit, you'll see that we look like a white film, but once you put so much pressure there, that won't happen, but like these parts here, you can see. all the wood grain in the background and then right here it got a little rough in this corner, but you want to have that vintage, dirty look now, when I'm done with this, I'm going to First, bigger project.
I'll come back with a dye, it'll probably be one of my washes that I used in my other video or I'll use the dye and we'll do it after the swamp polish, so here's our clean rag, so we're going to use this one more time to make sure removing all these little pieces of paper because you don't want them to end up sticking together, so I'm just cleaning them off. One last time I turn this rag over and make sure there are no little pieces of paper left, so once I've done that, I'm going to set it aside and then I'm going to go ahead and work with my glue.
Here's like my glue, like I've done before and I'm going to put a little bit here on my mat. You can use a paper plate. You know, everything you have. I'm going to take a foam brush and, like me. He said you can use the water brushes it will cover you just want to keep the stripes nice and smooth and what you want to do first is make sure it's dry before you go over it with the glue okay now that's all. dry I just took my heat gun and held it at a distance and dried all of this or you can set it aside and let it dry naturally but if you want to use a heat gun it literally took me like a minute to dry this so Now that's it try it, I'm going to take that Maj posh and I want to make nice, even strokes here and I'm going to try to stay in my photo so I can stay out, so I'll do it even right. strokes because how it's going to look there depends on how it's going to dry and it's going to be clear and they have most of the old projects and things like that, but I think it's already old enough, but you can use it, so I'll just go over it with that plate, you're safe, mosh mosh and I'll make nice, even strokes, trying to keep it all in, trying to put it all in here first and then I'll go over it and if you notice. every time it starts to draw, you'll see these little white pieces like that, but when you have this Maj project here, that will go away once the swamp part is completely drawn, you'll come back with that wash or just a baby wife will be fine and what I'm going to do is go back to any of these boundaries here and try to erase that Maj posh because I want to make sure that every time I come in here I'll be able To tint this, you can always come back with a piece of sandpaper.
If you put some bog polish on it, you can go back with a piece of sandpaper on the sides and remove it. Now you can also cover this like me. believe in polyurethane or epoxy, just whatever you want to do and you might not have a full lead like I do, you might want to do the whole picture in its entirety, but I wanted to do a lead. I still don't know if I want to. I've been thinking about maybe taking my wood stove and putting their names on here or just putting Racing err on it or even taking some vinyl and putting it on here too.
I'm still not quite sure what I want to do. I'm thinking about it, but what we're going to do is go ahead and let this dry. It doesn't even take, I want to say, 30 minutes, probably not even 30 minutes. Once this is dry, we'll come back and stay on the outside edges and you can see what the final products will look like, so we'll be right back, okay, now it's allcompletely dry and this is what it looks like, just needs one coat now. I can see here where Nadya is, here you can see a little bit of white down here.
I'm going to take my wood burning tool or Dremel and I'll just come and get it out of there or you can take a toothpick. just go back to it so that it looks like this so far, now what I'm going to do is go this way. I'm going to take this old English because I'm just taking whatever I have on hand, that's what I recommend. so you can use whatever I make. I thought about doing a wash, but she had specifically asked me for wood, so I don't know if she would like a specific color, so I'm not going to mess with a wash.
I'm going to do what I have on hand, it's this Old English, so what I'm going to do is take this, put it on a paper towel and wipe it off to give it a little more color. So put some on a paper towel like this and then get started. I'm going to try to stay out of the picture, so I stood up like this. You can take it on an AG paper towel, whatever you want to use. I'm going to go over everything like this. I think it was amazing, so I'm really happy with it.
I'm going to do what I said, go around all my sides, let it dry and then I'll turn it over and Do your best now that this is dry, wipe it off with a paper towel. Now what I'm going to do is I've decided to go over it with vinyl, so I'm going to go ahead and add a little bit of vinyl here. Mr. mess up here and write your last name here, so I think that's what I'm going to do for this and I just used my handy ruler to measure what I wanted. I don't know if I'll hold this together or break it.
I break it into pieces to leave it, we'll figure it out in just a second okay so what I want to start is the date here so I have a piece that I think is almost big enough from yesterday's project and then I still have that piece big and we're going to go ahead and pick them up, so we're just going to get this out of the way so we can put this here. I wanted to use white, but I didn't have enough, so I think this will be fine, so I want to do this diagonally that way it will fit everything and then I'll go ahead and varnish just to put it here, make sure you pick up all my points. and we find ourselves once again using the Dollar Tree contact paper, okay, and this is the watermelon front, it's the watermelon writing front, from deaf fonts.
Don't worry, I'll have that link below if you haven't downloaded it for your Cricut machine yet. I love this font, so we select it and I want to put it here in the bottom corner, so I'm going to make sure to place it really well, that looks good to me, so I'm just going to varnish that here, I think it would have looked a lot better with the white, but like I said, I didn't have any on hand, so this is Oracle 651 and the two places where I get that name, oh, I get this question a lot. where I bought my HTV from am I tearing up the vinyl and I actually put it up from most of the time since parce be calm and then if I don't buy it from Harvey I buy it from expressions and I have plenty of I also buy cricket vinyl , like mystery boxes and stuff.
I think the important thing is the good price also when they have their cells, so I have them too, so I bought the 318. I really don't think it was in the frame. for the 318, then there's the 318, so now I'll add the races or something first before I get it to where I want. I'm going to go ahead and pick it up with my I'm going to do the same. from the angle of my article here, okay, part of the angle is like I did with the other to make sure it comes from a pond reporter, so in case you ever don't think your piece will fit into a triangle, like this which Looks like this is the same piece that I used the other day, so I'm going to choose it right, now I'm going to bring it back to my wood, okay, and now I'm going to figure out exactly where I want this, so let's see.
I'm thinking we're down here. I just want to make sure I'm doing it nice and even and straight, so I'll put it down like this and then I'll pick it up and look at it. I think it looks good, so I'm going to go ahead and just varnish this and, again, you don't need to do anything special to do this. You could always have done it before you got the montage if you wanted and then I went over everything, but I just wanted to show you guys, add that little extra vinyl or, if you had done the farts that I talked about, how much more this whole project really stands out, like this I'm just going to write. to download this, so I think it's really cute, okay, now we're going to uncover the mystery, miss, so I need to figure out if because when I type it let me cut this little bit when I type it in design space that's how it comes, so I don't know if I should leave it like this or try to move it.
I think I'll leave it alone, something is out of the way and I'll get back to this. Maybe I can clarify it this time. I don't have to tilt my transfer belt. Alright. Bring this back in and now I'm just going to try to make sure I keep it aligned and make it as straight as possible. I'm thinking, so I want to appear like this. I'm not so sure. Let me leave this and see what I think about it. I think I'll take it a little bit to the right and bring it. Now let me try it, I like it, but I want to turn it up a little bit again.
I think it looks good so I'm just going to leave it like this and take it and just polish this here like this so adding vinyl to this project and you can always stencil this and do acrylic paints or you know like I said what to burn or whatever , but just by adding that little bit of vinyl you can see how much more it just highlights the project. I really love it, I think it looks super cute. I hope she likes this. If you found this helpful, hit the like button below and subscribe and I'll see you in the next one.
If you have any copyright issue, please Contact