How to make an Ocean Table // Concrete and Epoxy Resin
Feb 27, 2020Hi, I'm Bob, but I like to do things today. I'm going to
make
atable
that looks like theocean
. My wife loves the beach and I thought it would be cool tomake
her atable
that looks like a cross section of theocean
. I haven't done any projects withconcrete
either, so I thought this would be a good project to be able to do both. Well, let me show you how I did this. She had a piece of pine heart. to use for the legs and a large piece of melamine to use for the formwork.
The
concrete
floor is usually made of melamine so that the concrete does not stick when you take it out of the form to make the formwork. I simply cut several pieces that were tall enough for the sides and a square for the bottom. The size here just went over my head. I didn't want it to be too big or too heavy, but I wanted it to be big enough. To act as a side table to make this shape I simply screwed the pieces around the sides making sure they were as tight as possible because I don't want anything to leak out.
More Interesting Facts About,
how to make an ocean table concrete and epoxy resin...
I placed screws around the edge pieces and at the bottom to hold everything together. I wanted the legs to be placed in the square, so I have some smaller pieces of melamine to take up the space where the legs would go. Each corner was made up of two pieces, one the same width as my legs and a smaller piece to make up for the difference in width on the other side. I glued them together with some CA glue and then put them in place whenever you make a mold for concrete and want to seal it and in this case I'm using silicone. sealant to seal all joints, the cut edges of the melamine must also be completely sealed, otherwise the concrete and
epoxy
will stick to that like crazy, it will be a huge pain to remove, usually when people make pouring molds. concrete over melamine, they do it the other way around, so usually this bottom surface ends up being the top surface of the countertop or whatever they're doing, but in this case it's actually going to be the bottom of this piece, so it's not It doesn't really matter what's in here after the caulk dries.
I'll be sure to clean everything around before pouring the concrete. I'm not entirely sure this is going to work, but this is my plan for pouring concrete generally when it's poured. Specifically, you want it to be level and as flat as possible. In this case, I'm actually going for a more beachy look and what I mean by that is on one side of this table I'm going to have this. a lot of concrete and as much water or
epoxy
and then as it goes I'll change those proportions so it looks like it's deeper as it goes to the other side of the table we'll see if that works based on my friend Venu ADA's recommendation I bought quikrete 5000 for this.
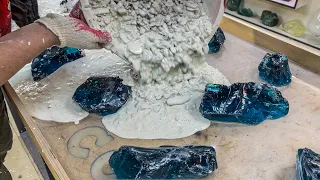
I didn't really know how much I was going to need so I just put a little bit in a bucket, added a little bit of water and mixed it until I got the consistency I wanted and then realized I needed a little more. I just went back and forth between concrete and water until I had a good amount mixed the way it was supposed to be mixed according to the instructions on the bag, then I lifted one side of my mold to get the angle. What I wanted I started pouring some concrete and then put the rest of the volume on top once it was all in the form.
I tried to compact it as much as I could and then took some time to shape it. To make it look beachy, I wanted it to be very thin on one side and very tall on the other, then I added a little texture on top so it wouldn't be too flat, felt it down and removed the sanding pad. of my orbital sander and then ran it along the sides of the forum to try to get rid of some of the air bubbles. I could have spent more time on them. I cut this big piece of heart pine to make the legs, I basically cut them out. the rough edge and then placed the fence where I could cut some square legs.
This is a really cool piece of old wood that I think was used as a countertop at some point, so it suffered a lot of water damage and just dirt once I had all the legs cut off. I just looked at them and chose the size that I thought would look best on the outside and made sure to go back and sand off all the gross stuff, all the dirt and everything on all sides. I had some other pine panels that I had recovered from the same location, these were cut into strips to act as cross braces under the table, between the legs.
I cut them to a slightly larger length because I wanted to place them exactly under the table when I was ready to build the legs, the concrete has been curing for about 48 hours and during that time I have covered it with plastic so it doesn't dry out too much fast. This is the first time I've done any kind. of concrete on a forum, so I don't really know what I'm doing, but there is a friend of mine who works at the place. Aida has a channel called modern homemade. I'll link to it in the description, it says a lot of great things. projects and a lot of them have to do with concrete, he pours a lot of concrete countertops and things like that, so if you're interested in more details on how to do this the right way, he's going to be a great resource, so check that out. link now it's time to pour the epoxy into this and this is another stage where I don't know if it will work or not.
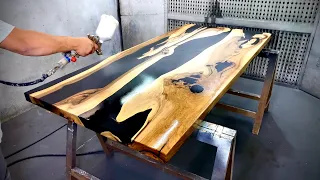
I have the feeling that there will be a lot of air bubbles. from concrete to
resin
and maybe that will make it look even more like water. I'm not too sure, but we'll find out. Before pouring theresin
, I removed all the extra bits of concrete from the side, everything that is left on the sides of the mold will be on the outside of the epoxy. I cleaned all the dust off of that and then lifted the mold at the opposite angle to what I had done when I poured the concrete. This will begin to level the overall surface.Following the instructions for the epoxy, I mixed them in a one to one ratio. Now it's very specific about how you're supposed to mix them and how long you're supposed to mix them for. You should definitely follow the instructions exactly. I added 10 drops of blue dye to this and wasn't sure if it would be enough or too much, but it ended up being a perfect amount once I mixed it completely and poured it over the top of the form. I had to move the form. Go around a little so the epoxy gets into all the corners and completely covers the bottom surface, it's pretty fluid at this point until it starts to set.
Once I had it completely there, I used a heat gun to lightly heat it. the surface to pop air bubbles that rise to the surface after four hours, when the first layer had cured. I mixed another batch with the same amount of blue dye and then poured it. I poured that second coat about an hour ago and I checked it again just a minute ago and it's cracking. I'm waiting for this because I'm pouring the maximum thickness in a single level that they recommend doing and I'm doing it in the amount of time they recommended, but apparently it's too hot and it's causing the top layer to crack.
I hope I can fill it with the next layer and you won't even see it, but you never know, we'll see how it looks after another six hours. I mixed up another batch and then took my time pouring it into this crack first. I tried to fill the crack completely and then used the heat gun to get the air bubbles out of the crack before adding the rest. On top, once I poured the rest of this layer, I was very happy to see the crack practically disappeared. I let this fully cure for another five or six hours and then added the final overall coat.
I used two gallons of epoxy for this and you can see how thick it was. I could have easily added more to make it thicker and make the water effect even greater after that final coat. I let it cure for two days to make sure it was really hard and completely cured and then it was time to take it out of the mold by unscrewing a panel. I was very happy with how it looked. I already removed the other exterior panels and the side pieces came off nicely. The corners ended up being a little more problematic, I think spraying.
It would be helpful to unmold the inside of the mold before pouring anything because I had to remove them so hard that some of the epoxy broke off. I also had to chisel all these extra pieces into the corner and it ended up looking good because the legs go to these corners anyway so you don't really see them, but it was a lot of extra work that could have been avoided if I had sealed these corners beforehand after remove all these pieces. I just used an orbital sander to Clean all the surfaces now every time you sand the epoxy it gets cloudy and in this case I want to make it clear so the first pass was to try to remove all the residue and clean everything.
I used some CA glue to attach them. Also re-attached the corners, the top edge of the epoxy actually went up a bit towards the melamine so it had sort of a sharp edge that had to be sanded down by sanding this edge, it also clouds the top a little but will polish it off. Later at this point I still hadn't figured out how to mount the legs together so I decided to use an X system underneath to hold the legs in position. I cut those pieces of pine to their final width at the final length. and then I had to turn them into an They made an X, but this is where it got a little complicated.
I cut a piece of 2x4 at 45 degrees to act as a backer on my crosscut sled on each of the legs. I put a punch line where I wanted these X's to intersect. I lifted a stop block and drew a line on the sled so I knew where to cut on each of the legs holding the piece against my 45 degree backrest. I ran it over the blade to cut a bunch of different slots. Now what this does is it cuts a flat angled slot in each of the legs. You can see what it looks like here.
It ended up working perfectly, so I repeated this cut on each of the legs on both ends. People often ask why I don't do it. I don't use a die stack for things like this and in this case I couldn't use my crosscut sled and I couldn't use the stop blocks or the 45 degree backer, it just doesn't make sense in this application after I cut all eight slots. I simply cleaned them and flattened them with the chisel. I did a dry fit on everything to make sure everything fit around the table and that all the joints were as tight as I wanted.
He was really happy and a little surprised that it really fit perfectly. The only fasteners on all of this are a screw I added in the middle of each of the X's going up from the bottom. It may not be necessary, but I thought. It would be nice to keep those pieces together. I added a lot of glue to each of the surfaces on each of these cuts and then put all the legs in place, some were tighter than others but the glue will help. expand and the joint should be tight once everything was aligned and fairly square.
I used some straps to pull all the legs inwards squeezing them down, it brought all the joints together. I put the top on to make sure I didn't make it too small so the top wouldn't fit, then I just had to let it dry and then it was time to start the sanding process. I used some spray adhesive to put 400 sandpaper on the back of a piece of wood and then started sanding all the faces after this. I used about 400 and a little water to wet sand these same surfaces. After this I wet sanded to about 1500 paper grits.
After that, it was time to polish. I bought a polishing compound that was actually really expensive and a couple of different options for polishing, one was an attachment for a drill, it didn't work very well and then I went to Harbor Freight and bought the cheapest polisher I could find. This thing was about 17 dollars. It had two different types of polishing. compounds so I tried them both and realized I had to do them in the right order and there were some places that just needed to be sanded more so I had to re-sand and then re-polish, basically spent a whole afternoon trying to make this surface as smooth and shiny as possible.
This is one of those things that I think could go on forever and ever and that you could keep polishing and sanding, but in the end I got tired of doing it and it looked good. I was pretty happy with how it looked, it looked like water, so I just wanted to finish when I got to that point and I was happy with it. I moved on to sanding and finishing the support. I went over all of this one more time with a little stop. sandpaper just to smooth everything out and then used a couple coats of danish oil.
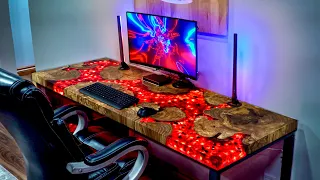
This is not a finish I use very often, but I put some on a test piece and really loved how it looked so I did a couple of coats wiping down all the surfaces and was very happy with how it made the green will highlight, then simplyI dropped it on the top piece and voila, this took a lot longer than I expected because I had to do it. All of these things multiple times also made it a lot more expensive than I thought it would be, but in the end I really loved how it turned out.
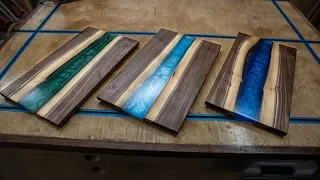
I love how it looks like a beach and gets deeper and then the color sets. darker over here, just like you would in RO water. I didn't completely polish the top and sides. I spent a lot of time on it and finally got tired of doing it, but the good thing is that I didn't attach it. the top, the weight of this keeps it in place which is perfectly fine but I can remove it later and polish some more or if there is ever a scratch I can always remove it and fix it without having done any concrete before. a few things i forgot to do after doing this a few times the first time i did it i vibrated it really well and got rid of all the air bubbles but after doing it a couple of times i forgot to do it so in the future i will have to remember to do some of those things to get a more solid pour here and not have any of these gaps at the end.
It looks very organic down here and that's great, but it would be great to have a nice solid line that matches the solid line at the top. The concrete looks a little white here and I think that's mainly the enamel I was using on the epoxy. that stuck to the concrete so I should have sealed the concrete first before polishing it I think, but I'm going to go back and seal it anyway and see how it turns out. I wasn't really sure how this wood works either. I would look at the side of these things. I was really concentrating on the top and was going to figure out the finish of the wood as I went.
I thought about painting it white to make it look a little beachy. I thought about making a steel frame. instead, but I realized that that would probably make it seem really cold in the end. I loved that the wood has an orange color next to the blue water and I think it combines very well. I am very happy with it and, most importantly, my wife is. I am very happy with him. I'd love to know what you think about this one or if you've done anything like this. I would love to see it. Let me know in the comments.
I have many other projects of all kinds that you should definitely check out and don't forget to subscribe, that's all guys, thanks for watching. See you next time.
If you have any copyright issue, please Contact