How to create objects in DIALux Evo
Jun 08, 2021Come ask the life designer, we will discuss different lighting techniques to benefit each lighting designer. Today we received a request from one of our subscribers, Mr. Mahim wanted to understand how we can
create
extrusion volumes that are difficult or more complex than the standard square rectangle, so today we will try tocreate
a facade feature of one of the projects in the ones I was working on to understand how we can create an object, a complex object and how we can use extrusion volume for the same, to begin with, we will simply open the daleks and import one of the CAD drawings, in this case, we are importing it as elevation drawing because we want to create the facade. model, so we have the elevations now, what we will try to do is try to create an arc that is a simple extrusion volume and we will also try to create a complex object that is a combination of multiple extrusion volumes to understand how we can create extrusion backgrounds and what can we do to create a complex object before continuing.
I would like to remind viewers that if you have any questions related to lighting or design, you can leave them in the comments and you can also email us at ask the appropriate designer on gmail.com. All the links are in the description, so for any import of any drawing or image file from Galaxy eight and up, you have to go through the import process and then put in the dimension scaling that we call. and then finally we have the keyboard setting the sum and then putting in the measurement units along with the millimeters, let's see how it works normally, a millimeter or a meter should work most of the time unless it's a special scale so we can just check the event so we can select any area, let's say this window let's see how much appears to be 0.8, which is logical, the window so that the scale is correct and we import this file now, all these elements can be created as a volume of extrusion, but I will focus on only two of them, as mentioned, we will try to create a very simple extrusion volume and a complex one, so let's start with the first one, which is a simple extrusion volume and an arc, so to this you need to go to the object so after you have drawn majorly let's go to the object we will select an extrusion volume so now to zoom in we will start we will do this one so we will create the arc of this one so try to select an extrusion body.

More Interesting Facts About,
how to create objects in dialux evo...
One point, it's pretty simple, you are just following the CAD drawing or the image that you have in our case and we are following the edge or the line of the image, so if you make a mistake remember control-z you can always go back so you don't have than repeating everything again, for example, I just do a cut rosette, that's how you go back to it if you want, that's a useful tip in Evo, okay, that brings us to the competition of okay, so here we go. So if you can see, okay, now you can see that we have created the arch, but we just need to make sure that the arch is logical and then you can get the dimensions from the architect because we have the elevation drawing here, but I don't know what it is. the thickness of the arch or anything on this elevation drawing, so you can go back to the architect to get the thickness or you can approximate it.

We just do an approximation, yeah, because normally the window arch is not very thick, so that's what I'm going to do now there's one more step we need to do when you have the cabin, you're creating the object, you're creating it in 2D, but when we talk about renovations, it's always 90 degrees, so what will we do? We're going to create this object and we're just going to rotate it, so if it's a single object, you can place it here at 90 degrees, but if it's multiple
objects
and you don't want to combine them, you can just select multipleobjects
and you can easily rotate them using this rotation and then move them accordingly.
We also have the front view where you can place them, so for now we'll keep it down, oh yeah, okay, this is how you'll create a simple car. We can also give it a little bit of color from here, so just go to the Beach color catalog so that you have the color so that you have a simple object using a simple extrusion volume and now you will see that we have now we will go to a little more complex. These elements can be created using extrusion volume, you have the columns, you have the arch, all of them, even these, can be created or you can approximate them to a simpler design, but we will focus on this one because it looks very beautiful, so we will try create this arabic layout also so the process is the same just go and create the extrusion body and it will keep the elements so now again we need to remember that we need to add the height so again we will just use this one and then we just need to make a combination of different objects, so what we are doing is trying to create different objects and then in the end we will combine them all, so now that we have created one object, now we will make another one which is So as you can see, it is very simple, it should follow the extrusion line to create the extrusion object and then enter the dimension for the extrusion object and now we have this zero point so now we can check the 3D of how it comes so we have yes so these dimensions will be better check with the architect what is the actual dimension of the item so that he can create the item much better and then we will just copy it so now we have created it. this exterior layout now we need to create the interior layout it's pretty simple what we're going to do is go through them all and create different layouts and all I'm going to do is just create a queue and open it 0 5 then Like I said, create an extrusion volume, the extrusion volume complex is a combination of creating the objects themselves and then having the automatic operation, which is the addition and subtraction of objects, so in this case we will simply copy and paste the other object. and then we have it so now we have the object with we'll keep it at 0.06 and you can see it from the side.
What we're trying to do is subtract this just because we're going to need this inner object, so we subtract. this one yeah now you can see we have the object sin so now it subtracts okay okay so what we did we just select what object it is and okay now we have this object and it fits the other one so you have . have a 3D view, then finally what we will do is also create this one that we can also adjust to make it more precise, finally we will create this object inside which again it will follow the same concept. and just create the slice of the object, we'll subtract the object from the inside, find me, create a much more complex object from this, so right click on the closed polygons now, before we finish this one we actually have, now we'll do Ctrl- c.
Ctrl-v is fine and then we'll reduce it to size. You can subtract this object from here and we want it to be 0.05. Now with this it will be 0.06. The reason for this adjustment is so that it subtracts from both. the sides because if you don't adjust it in the center it will be subtracted from one side, so we have to subtract it, throw it so that the pink is the largest circle and now we subtract it so now we see. you have the complete object here now we need to do one more step which is to combine the entire element to make it a single object, so what we will do is select them all now there is a point of concern here for example now you see if the object that we selected last is the object whose center of the center of the zone will be the center of the final object for example in this case if I am selecting like this and then I am selecting this and now I am doing it combined, I see that the center of the object changes now we do not want it to be like that, so we just split it now what I'm going to do okay so what we're going to do is we're going to combine it into At the end we're going to add this one because we need the center so let's combine it and now we're going to have it in the center so it's very necessary to have the center of gravity whenever we are dealing with complex objects, so we just have to verify.
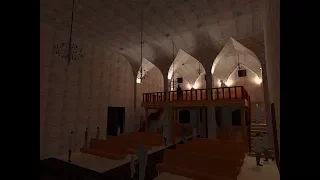
How does the center of gravity come in? Because unlike Daleks 4.13, we don't have the option to change the center of origin and the evil root, but then you have it, this is how you can create a complex object and a simple object. This is how the whole output will look like this, if you have your arch, you have your complex objects, as you can see, you have a more complex Arabic design, you have all these elements, heat the arch, the indentation and even the arches for the windows, the pillars, everything was created. in Daleks Eva as you can see and this is how you can make your own design with 3D objects complex 3D objects, simply create extrusion volume by adding or subtracting and then finally making a combined object.
I hope this video was useful for you to create more complex objects until you meet next time remember keep writing keep writing lives and if you have any query or question just leave it in the comment box or send us a task designer
If you have any copyright issue, please Contact