How To Build a DIY Smokeless Fire Pit That Really Works!
Jun 04, 2021What's up guys, Adam, here again? Today I'm going to change our standard
fire
pit into the ground typefire
pit. Now it wasreally
easy to make and also pretty inexpensive, so that's probably why I chose it in the first place, but I like it. Most bonfires smoke like crazy, so people have to sit to the side or move around depending on which direction the wind is blowing just to avoid excess smoke. Also we also have a baby so I am very cautious, we havereally
had to reduce the fire and many months ago I started researching and thinking about how I could make or find asmokeless
fire pit.
I continued searching and found these freestanding, almost inset ones.
smokeless
type fire pits and in my opinion they are a bit small and a bit pricey but in the reviews people were raving about how well they worked so I was researching how they work and thought how can I do this? I take the technology or science behind this smokeless fire pit that so many people sayworks
so well and turn it into a larger, more conventional looking fire pit that we like, so I think this is going to turn out quite a bit. okay, but we won.
More Interesting Facts About,
how to build a diy smokeless fire pit that really works...
We won't know until we've done it, so let's go ahead and jump in and see what we come up with. Let's go now. One of the most important items that will be needed is a fire ring and this particular shot I got online and I have a link in the description below where you can check one out for yourself but this one comes in four pieces and screws together with eight bolts and comes together very quickly. Now I chose this specific shot because it has this. flange or this ring that goes around the entire top of the trigger and the reason I did that is because it will really simplify this installation and when I get to that step I will explain a little more why having this ring on the top will really make it a lot easier why it is so important.

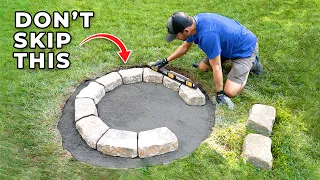
Now that I have the old fire pit completely filled, I have my stones nice and level and I can now start placing the lowest level of stones that are going to be stacked around the outside of this fire pit, so I'm going to take a short break. when placing this first level of stone. I wanted to show that I'm leaving at least an inch and a half. space more or less between the inside of these stones and the shot. I want to be able to have a space here or an envelope basically of cold air where eventually that cold air is going to be introduced into where the fire is going to be and that's what makes this whole thing smokeless, so you know how I said before that I needed to introduce air in that little pocket he was making between the stone and the ring of fire.

Okay, now I need to remove some of these stones so I can get that air in, I'm going to take them out and break them in half to allow air in but also allow for support for the second row and no I don't have an even number between each of these. stones to make it completely even which ones I'm going to take out, so I decided to go with every third stone, every fourth stone, every third stone and then two and then the fourth stone. now you just go ahead and take them out to split them, so the good news is that since I have four holes to fill at the bottom of the first row and I only need to fill them with halves, I only have to split two of these. stones, so less work and more leftover stones.
I have personally found that the best way to break them in half is to simply use my hand. I have been training for many years so if you haven't trained then I wouldn't recommend doing this at home but I personally found this to be the quickest and most efficient way to split them in half so let's go ahead and prepare for this now, Don't worry if you're not trained in the arts. From raqqando like me there is another method that is really easy to do and now I will show you how to do it. The three main things you will need to do this are what you will need. some safety glasses you're going to need a masonry chisel and a good sized mallet or hammer so what we want to do is take the chisel and we're just going to mark this half of the stone using this hammer.
What we're going to do is promote a good balance when we finally put the chisel on the other side and it breaks, so we're going to turn it over and now we're going to take the chisel and do the same thing, but I'm not going to stop until this rock breaks. in half and there you go right in the middle of the way that you need to make it right, so now those stones are split in half, I can put one in each of these spaces for support, but also allow the air to pass through and then continue with the second layer of stones, so I could have done this step a little earlier, but now it's fine too.
Now I need to grab a hole saw and I need to make some holes. along the top of this ring of fire around it and just to give an idea of how this is going to work now we have our stones where we split them in half and we have holes in the bottom that allow for cooler air . We have our cavity or envelope between the stones and the ring of fire where the colder air can settle and when that colder air settles there, it will be worn away by the fire, causing it to rise and enter the fire through The Holes we are about to cut will supply the fire with warm, oxygenated air, causing secondary combustion to help burn off excess smoke.
I've talked a little before about this specific shot and why I chose this bridle. By going all the way around, it covers that cavity where the colder air will be, so if it were open instead of having this on top, you would have to put something on top to keep that cavity closed for later feeding. the colder air comes in through the holes we're about to cut so let's go ahead and cut those holes right so I've completely upgraded from safety glasses to safety glasses because I literally feel like I'm swimming in metal shavings. And I don't know the last time you had a piece of metal in your eye, but I never have and I want to keep it that way, guys, so now that I've got all the holes cut out, I can finish. because the lid keeps everything like an envelope down, but only for aesthetics and will help close it much more.
I'm going to add another row of stones to this if you want a larger stone on top, there you go. Make larger cap stones that you can put in there, but I think this looks pretty good for pretty much just using stuff I already had, but now the real question everyone is wondering is does it work and the answer is yes, it does. or should I say holy smokeless, that's amazing. I should have done this a long time ago. That's awesome, okay guys, so I really couldn't be happier with the way it turned out. It looks great at least in my opinion and more importantly.
It
works
exactly as I expected, now it didn't remove the smoke one hundred percent, but that will be almost impossible every time there is a fire, so it has reduced the smoke by a huge amount, so I would consider it a huge success, I hope Have you found this video, be it interesting, if so let me know by leaving a comment in the comments section and also like the video and if you like videos like the ones I made here today then consider pressing that red. subscribe button and hope to see you next timeIf you have any copyright issue, please Contact