Dollar Tree DIY Gift Wrapping Station Wall Organizers - Easy Less than $10
Feb 27, 2020Hello again everyone, Josie from life, she is fifteen years old, thank you for joining me here on my channel today. I'm showing you how I've used this
wall
to organize the things I use to wrapgift
s and I'd like them to be centralized now. I call this mygift
wrapping
station
or something like my giftwrapping
command center and let me show you that this is a combination of my previous DIY projects. If you've been following me here on my channel, you may be familiar with some or all of them. For example, this is how I organize my wrapping papers using the Dollar Tree pot lid organizer or holder and I understand that these days I don't think you can buy them in-store or even on Dollar's online site Tree, however, I know Dollar Tree does.
I recirculate them again during the spring or summer because I buy them year after year, so I simply hung this organizer on the
wall
with a piece of carpenter's nail. You can also use Command hooks but I would suggest using picture hooks or heavy duty nails because it can get heavy now I also added the gift bags here at the bottom, that's something I didn't show in my original tutorial and by the way I'll link the video of that tutorial and in this space here I actually had a scroll and I'll show you where I put that scroll later so what I did with this one was hang it this way where it's like a sloped ceiling instead of a letter V so that act as a stopper and This was suggested by one of my viewers also in that original video because in that original video I was showing how I used clothespins on top to make it stop rolling, but lo and behold, using it backwards is much better because it acts. as its own plug, so with Dollar Tree wrapping paper you can fit two inside each slot or tier, but if you use thicker ones or larger rolls of wrapping paper, you can probably only fit one in each section, for example, even here at the bottom I can put this one back and it will still fit, look at that, can you imagine this is seven, if you double it, there will be 14, so let me show you this here where I put that roll of paper gift and I have hung two hooks here and you can also use command hooks, but I use these two leftover hooks and I also bought them from the Dollar Tree.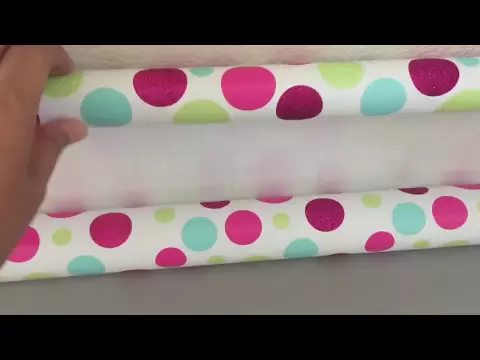
More Interesting Facts About,
dollar tree diy gift wrapping station wall organizers easy less than 10...
I think they sell them for six or eight in a pack, they don't really match, one is round and one is square but they still work and I hung this one the way I did. I make sure it's not too flush so I have enough room to remove and insert a new roll each time. Make sure you have enough space to put it in, look at that, so I go in on that side and then this is just a simple DIY, a couple of hooks and I have a gift wrapping paper dispenser and look at how smoothly it unfolds and then I can go back roll it up if you're done and the distance between the table top and the hooks is only five inches so you don't have to roll down or pull down too much material.

I was originally thinking about this height, but I thought closer to the table it would be. much better to not have to take out too much material and by the way my table is just a simple plastic table that folds and this one is old, my husband bought me this, I think it's Walmart all of those. They are available at both stores and probably only cost me $20 or
less
than $30 depending on the size because they can be as wide as you want. I simply chose one of this type in small or medium size for this space and it is perfect for wrapping gift items.
Now the next item I just put together using a couple of command hooks and such a deep basket from the Dollar Tree so it cost me about $3 and if you're going to go for command hooks just the ones that are the biggest , you can also use brads like the ones I used here. I use nails and apologize for those holes. I've been putting something in, they're just trying to line up the picture frame before covering this with this contraption, so anyway. I used the command hooks to make sure they were pressed against the wall and juiced these baskets to hold my gift tags as well as black note cards because I often accompany a gift with a card, greeting card or a blank note card where I just write my greetings and I have some loose ribbons here and I can put some gift bowls in here that I'll be making or you know, Dollar Tree also sells those gift bows.
I just want to let you know that you can buy them if you don't know how to make them so yeah just for three bucks or sometimes just a buck if you're just going to use nails but this is the package for that command hook it's a hook command of two pounds of the
dollar
. Tree so the next organizer I'm going to show you is this shower caddy organizer and I have a tutorial on this one and I'll link it here. I created this probably nine months ago where I used it as my tape dispenser. and then I created another DIY where I added some placemats and baskets and made them my washiorganizers
as well.It's actually a universal craft organizer and I put it in the description box of that original video. What is this? for the toilet paper rolls I wrapped with my leftover contact papers from the Dollar Tree too, so if you don't have contact paper you don't have to buy one, what you can do is just use leftover decorative paper, even the gift to be honest or any scrapbooking materials that you have left over, you can cover them and I have cardboard underneath and just watch the full video on how I created this one and assembled this one, but that's the part here where I remove the tape dispenser. really handy for the purpose of actually fitting into the actual Dollar Tree basket and I love that the Dollar Tree basket because it's flexible it's not as rigid or as hard as the ones you buy at other stores and this is where I put some of my ribbons because sometimes I decorate my gift wrapping or gift boxes or boxes with decorative ribbons or even greeting cards.
I put on some tapes. This comes in a set of three or four, sometimes five for a
dollar
, all the more reason for this. The container or basket is perfect because there are already slots or holes that the ribbons can go through and I can only fit at least sixteen small ribbons in here and I bought this on sale from Michaels, yeah, and I also used a wooden dowel. it could hold the reels of tapes and sort of dispense them and also keep them in place, let me take this off so you can see what's underneath.This is another DIY, actually underneath one I created, there were three that I just removed. one and it's just um you know they just attached using a glue gun or hot glue now let me show you what I use this for okay and I'm embedding the tutorial here. Two is actually two and originally three again. I removed one. Placemats are made of cloth, it is fine and you can get them in kitchen. I love the Dollar Tree. What I've done here is I just lined them up and you'll see in the tutorial and glued them together. so I glued one first, you know, 3/4 or so of the way and then the bottom one would be a little bit lower and then yeah, and then I just drilled some holes, you can use a blunt object like maybe cut it with a utility knife. cut or you know the blunt section of your scissors or even in all if you have a punch and I'll show you what I'm always and this is what I use when I make my inserts for travel journals or a meal, you know, carpenter's nail.
It can also be used, you don't have to buy everything and then just make sure before you drill the hole you just mark it so you can plug it in and then this is where I put my tissues for my gifts. I just fold it. I got this from the Dollar Tree too. I'm also these gift boxes or from the Dollar Tree, so even the materials I use are from the Dollar Tree. Here's the calendar so you can mark it. So I've marked it. the dates here for December so far, so December 2nd is an anniversary that we are invited to attend and of course we will bring gifts and then on the 23rd is when the family, my husband's family, will exchange some gifts for you. holidays and then the 27th is my brother's birthday marking them there then I know the update is coming in a bed is coming and I need to bring or carry a gift so many times in the past we were grabbing things and they are everywhere and now it is more organized so let me put this back here and it's that simple so on the desk I have this old paper towel holder.
They also sell paper towel holders at Dollar Tree. Use this to organize my tape too because instead of wrapping them with wrapping paper I sometimes use tape and instead of a regular tape dispenser I also use this one because to be honest I like to cut it that way on instead of with a dispenser, but yes, I often use it like I said. These tapes anyway and then I just use a pair of scissors to cut them out and here are my clothes, so that's it. I hope you enjoy this
easy
tour of my gift wrapping command center for gift wrapping wall or gift wrappingstation
organization.I hope I have given you enough ideas or inspiration to use the same DIYs that I filmed and uploaded here on YouTube. I'm linking them all. It's here, so it's not very nice. A tutorial or DIY video is more like a tutorial. I like inspiration ideas and how to use my DIY. It only cost me about nine dollars to make the whole thing, so I hope to see you again in my next video. Please like, subscribe, share this video, leave me some comments below. Thank you all have a great day
If you have any copyright issue, please Contact


