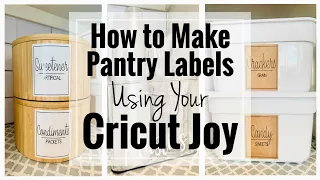
DIY Pantry Labels on a Cricut Joy, Maker, or Explore!
Jun 01, 2021Hello everyone, my name is Jennifer Maker. Today I'm going to show you how to properly design and cut
pantry
labels
with a Cricut cutting machine in the Great Maker program. I recently renovated my kitchen with beautiful glass front cabinets and I can't wait to put them in. There are some jars in there, but the thing is, I need to label them because otherwise the ingredients are too hard to distinguish. I had been using my brother Pete's CH labelmaker
, but thoselabels
just aren't very pretty or big enough to reach from a distance, so I'm going to use my Cricut to create my own custompantry
labels that look good and are easy to read and I'll also show you how to do it, so for this project, do you want a full sheet? label paper like this one orcricut
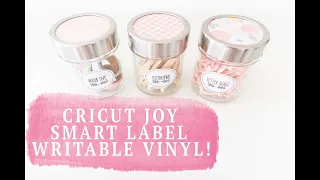
smart label writable vinyl on a roll now i prefer smart vinyl smart label for the way it looks and i think it looks.
I think it sticks better to surfaces too. You also need some jars and jars to label. I'm using Aqsa pop containers as well as glass jars of various sizes. Now, if you use glass jars, look for ones with smooth sides, as your labels will stick to them much better than those with raised designs, you know, the ones I use. I'm talking about now. I'm going to use my Cricut cutting machines to cut and correct my pantry labels. You can make them on any Cricut, but in this tutorial I'll show you how to make them on a Cricut Joy and a Cricut. creator, but an
explore
r would also take advantage of the advantage of using the Cricut joy is that you can use the smart label material without a mat and it's easier to take the Cricut right into the kitchen since you label all your things and don't have to keep making round trips back and forth, and you also need a pen for your labels.
More Interesting Facts About,
diy pantry labels on a cricut joy maker or explore...
I am using a black fine tip Cricut pen, which has a four millimeter tip, the size of the pen tip matters if you use my designs, your Cricut can do this well and to decorate your pantry labels with the pen directly on the machine and they look fabulous it goes straight here now last but not least you need to design your pantry labels it can be simple or elegant it is completely up to you. I'm going to show you how to make three different styles: a super easy simple tag, a big, bold easy-to-read tag like this one, and a fancy writing tag that's totally on trend.

I'll even show you my personal tricks for getting the cricket pen to film thoughts of the boldest and most beautiful labels, so let me start by showing you how to design pantry labels that fit your style and decor. Step 1: Design your pantry labels here, we're in the Cricut design space, which is the design software you'll be using for your Cricut joy. Cricut
explore
or a Cricut creator click new project here on the left. I'm going to show you how to make three different styles of pantry labels, the first one will be simple, the second bold and the third elegant, let's start with a simple one.
For every pantry label that we make we need two basic things: a shape for the label and the writing itself, the label that we put on it to start with, let's get a shape, click on the shapes here on the left and you can click on a circle for For example, we have a shape that is quite easy. Now let's make it white just because most of our labels are white, and that helps us visualize it, so we go up to this box up here while the circle is selected and click on the white. square so now we have a box it is important that you make your label the correct size for your container for example I know that a two inch circle is the correct size for my container so to change the size we go to the top here below size. and we just select the numbers and change them from whatever to whatever we want it to be, so I'm going to type 2 and press enter and it will resize for me and I'm going to use these buttons down here to Make this a little bit bigger so we can see what what we're doing, just the view, not the actual circle, so here we have a circle which is cool, but we need to put a label on it, don't we?
So the easiest way to do this is to click on the text here on the left and a box pops up that says add text here and we're going to type in a name for our first ingredient so flour is too big so we're going to use this. change the size of the controller here and click and drag it until it's like a sleeve to the right size and click and drag it into position now it's very important, we need to tell Cricut that we want to use the pen to write this label on our pantry. to change it from cut which is the default for draw so everything is cut by default and it's important to understand when you want to draw something you need to change it to draw so with the word selected go to the line type menu here on above and choose to draw like this, okay this is the way it will be written on your label, maybe you think this is awesome and if you do then you are almost ready to go, all you have to do is select your shape and type your word on both so you can see they're both selected here and then click attach if you don't do this it won't actually show up the word on your label okay if this is all you want and you love this so this is it you're ready just make sure you've changed the name of your draw tag your shape is cut out and you have them attached and you can see them here attached okay but what if you want to?
To change the way this font looks, what if you don't like this bubble letter effect? A lot of people don't want it to look like it's actually written with a pen that you could have made and have it look good and not weird. outline, you can do this and you use a script font to do this, so let's first separate everything so we can get there, our larum, our word here, so now I've selected our name and I'm going to go up and we're. I'm going to choose a different font so I'm going to go to the font menu right now it's crickets and usually the default is that and here under the filter on the right side I'm going to select writing and this will show me just the fonts that have a writing style, meaning it's going to be just a single line or something like that that actually looks like writing and if you don't have access to Cricut, a lot of them will cost extra, but there is one and I think it's actually Cricut. sans is just the writing version so if you have access to something with an a it means it's included in the
cricut
access so what we have to do to access the writing font is go to the style at the top of the screen and choose writing, so if you don't choose writing, you won't get the writing font and there we go, you'll see how different it looks, it's very different, so let's make sure everything is lined up, so I selected both the shape of the label as the word to go to the alignment menu and I'll click Center and that will align my two ingredients.I made my circle and then I'll attach it again. Make sure you have a drawing layer and a cut layer and this is my friends it's a simple pantry label you can make them with any of the writing fonts any of the fonts you can choose whatever you want and you can go crazy and make them for everything, so we'll leave this one aside and move on. to the next label I'll put this here so it's out of the way for us okay so our next label is a bold font this font isn't particularly bold and if you have a pantry like mine that isn't well lit it really is.
Quite small, it's hard to see a dainty platter like this in your pantry and you don't want to grab the flower when you really wanted the cornmeal, that's not going to taste very good, so there is a way to make a bolder platter. and let me show you how to do it so again we'll make a shape and this time I'll just choose a square and if you don't like having boring shapes like this, there are alternatives if you go to images and click on cartridges. various cartridges here flowery line labels decorative line labels lining up simple lines bar lines all of these full of shapes and styles of labels so there are a lot of labels here so we can choose this one and I have these labels are part of the access to Cricut and just so everyone knows they're called simple labels, so I'm going to choose this one, we're going to use this one instead, so go ahead and delete this square so I know that for my jars, not my containers, I want them to be for my larger containers. 4 inches and it's also important to know that Cricut Joy likes the maximum size if you're going to use label paper is four and a quarter inches, I think that's about right for a quarter inch, so let's make this four inches wide so that I'm just selecting the size at the top and changing it to four, so let's go to a nice big four inch label, it doesn't matter what color it is, just that you can see it well, so now we need a font and I.
I mean a bold font, so I'm going to click on the text and I'm going to work properly on my gradient name, we're just going to use it to say one so we can compare it. It's nice and easy so here's the word flower it's not bold but there are options and I'm going to use a font that I downloaded online that has a fill that goes with it and it's called carte blanche and we had to change this filter to that says my right sources, let's close this and do this again, stop typing, here we go, if you ever can't find your sources, make sure your filters can click on clear filters like this, you can click on the system and that will show the fonts you have uploaded.
I have a full tutorial on how to find backgrounds and load fonts in Cricut Design Space on both a desktop laptop and the iOS version of Cricut Design Space, so this is what I want, it's called DK carte blanche and I'm going to switch. Go to that and you can see right away that this is going to be an incredibly awesome bold font, right now it's set to cut well, so make sure you change this to draw the line type menu, here we go, this is what it's going to look like. when it's drawn because it's filled with these are kind of hash marks and this is quite unusual, there are maybe a dozen fonts that have a kind of style like this, there aren't many and I don't know of any Willy. which are part of Cricut Access currently, if you want this font, it's over on dafont.com, so we have this set to draw, we have our label, let's select both layers, let's go to a line and choose Center like before and then let's attach them there.
Come on, now our bold parents, your tag is ready to go, so let's get this over here now, how about a fancy tag? So I've got you covered. In fact, I have designed a lot of things for you so that you can make labels that are bold and beautiful, so they are on my blog, my blog is located at Jennifer
maker
.com and these are free plates, that is very clear, my designs are always free and you go to the red bar at the top of the screen and click. when you enter the library and once you are in the library you can browse, but I have a pretty long list of free files and it can be a little difficult to find things, I admit, so the best thing you can do is search the library. page you would be typing on your keyboard command F on Mac or Ctrl F on Windows, so here's a little window that pops up and I'm going to type in the word pantry and it's highlighted there for me and everything I have.What you need to do is click on this file and it downloads and once it's downloaded I can open it and here are all the files and I have label shapes and I've written pantry labels so let's start with the shapes and you want the SVG file every time you charge it. Not now, don't look like that, that won't help you. Instead, go to Cricut design space, click upload, upload images, browse, and then find the file you're looking for, so here's my downloads folder, here's the file I downloaded, and here's the la tag shapes the SVG file, it says SVG right in the file name, if you ever can't see it, make sure your window is fully expanded so you can see the full file name.
Okay, I click on that and we'll open it. above you see all the shapes here I have a lot of them and we select them and then we click insert images to put them on our canvas and now I'm going to make the canvas smaller so we can see all these beautiful shapes, there are many. of ways here I am going to choose. I actually have a couple different ways to do this. First I'm going to ungroup using this icon on the top right so that the labels here are separate and can be selected individually and I'm going to use this one here to show you how you can make a really cool border and I'm going to use this one here to show you how we do the nice Penda font and now go ahead and just grab them and hide them for now no No need to worry about here's the group and justwe click I to hide them since we are not working with them now.
I want to go back so I can see my files much better. Well, here's one fancy tag and here's the other one. one isn't very fancy yet, so for this one I first made a nice border. Now again, this is done with the. I mean, technically, you could cut it directly from this label if you wanted, but I think it shows. much prettier when it's pinned so we need to change this from cut to draw and it looks like this and you can even change the color because I wanted to make this in teal so it's not teal and then we can put a name right in the middle I want say, we can't take one of these or we can make a new one, let's use one of the other Cricket script fonts, so I'll type flower and we'll go up to the font menu. and it gave me, click on filter, let's first click on to get rid of our search, our search result and click on filter and click on clear field sources to be sure and then click on type and these are all the writing fonts that are available and there are There are so many options here, a lot of good ones for labels.
It would be things like be mine, anything, I mean, sometimes that's not how your label is going to look, your writing isn't going to look, so a Sometimes you just have to experiment and see what looks good in your font and this is a fun thing about designing a label and working with the design space, you will spend a lot more time designing your labels than cutting them out, that's the easy part, I actually know which was for me, so here's a nice font, it's called dandelion, let's go ahead and change it to that so we can see what it looks like, I'm going to click and drag it on top of our label and use a resize handle so it's the right size and I want to make sure that it's drawn, it's selected as drawing and let's change the same pencil color as our outline, which was Jala teal because it's going to be a lot more efficient and yeah, it looks amazing.
I think, just like before, we need to select everything, so we can't just click and drag a selection box. it's like this or you can use it, you know, click on the layers on the right if you want and then click attach, so now we have a fancy label that will form this nice leaf border around it and the word flower, now let me show you. you are my favorite and this use is another file that I created so let's upload it click upload upload image and browse and find the SVG file set with the pantry labels and click open no this is an image big and you're You'll get a warning at the top saying the image is big.
Have patience. If you have a slow computer it may take a long time so be patient once it loads you will see it here and then click Save again. be patient it's loading I think it's three megabytes and it has to process all that data so be patient and let it load so once it's loaded click on it so it's selected with the green outline and then click insert images and give it a bit. It's time to load on your screen here we go they are so pretty so these are all SVG files that I have created and they all use the pencil font and they fill in to create this nice beautiful bold writing font so one once they load, we need to ungroup them so we can select each one individually and let's click and drag the flower onto our label like this and I'm going to zoom in so we can see that now remember what I said before that the files are defaulted to cut, like this that if you look here in the line type menu and it says cut, you don't want to cut this, that wouldn't be fun and it won't look good at all, you want to draw it, so you click draw and you know you don't.
If you don't change the letters on the bubbles, it stays that way and that's the magic of this SVG file I designed. There are 55 tags in this file. I hope to have most of your pantry items, of course, not all, for example, some people. I have wheat flour and cake flour and white flour so okay let me show you what to do here's the flour and we're going to click on the text again and we're going to type cake so here's the word cake and I just give myself a little space, okay, so this font doesn't look so good, no, these two don't go together, they're both too fancy.
I recommend a much simpler font, let's go to the font menu and say a nice simple thought. Cricut sans is probably fine and Cricut sans is free so let's select that forget sans okay and let's make everything uppercase instead of lowercase let's say a cake like this yeah so better and then we'll use our resize handler to make has a much more appropriate size and click and drag this right here and make sure it says draw, which isn't that awesome, guys. I think it's super cute, so we have our flower layer that is set to draw and we have our descriptive word. which of course is not necessary if you only use one type of flower and we have our fancy tag, so again we select everything for that tag, just a time tag and click attach, so now we have four tags. our simple basic label we have our bold label and we have two fancy labels yeah, aren't they cool?
Let's make the backgrounds all the same so Cricut understands that we want to cut them all from the same paper. that's important to do, let's find the background to find the label shape of each one, so I'm going to select it and then on the right we'll see all the layers highlighted, click on just one, put in the label value. shape and go up to the color menu and choose white weight, it's good because we are working on cutting them wait, do the same with each of the others find the shape of the label click on it change the color to white and again here it is the shape of the label and we will change it to white and since we are going to do all this on one sheet or at least we will try two, we are going to change the color of the ink that we want to match the others, so Let's change it back to black, not gel, fine tip, black, and this is an important distinction.
All this. My flower fountain here is designed specifically to work with the fine tip pen, the 0.4 millimeter pen, which if you make it bigger, I can do that. I don't guarantee it won't look as good, it could fill in a lot more, but be too bold and you might lose some details, so I recommend sticking to the fine point. Something else is important to note, you'll notice that you didn't actually change the size of the flower once it was loaded and this fancy one wants to keep it the same size? Roughly it could be a little smaller or a little bigger but not much more without losing some of the cool bits they are well filled so keep that in mind it is designed specifically for open pantry labels of course I know that They are going to ask me, what if I want to make my own that they haven't thought about?
I used a source to create these, it's called shelleyan script and I bought it online in thought packs. I have a commercial license for it and we're going to change it to that, so here are filters, type shelleyan here, it's here, fixed this letter spacing, it drives me crazy. No, there we go, that's a lot closer, actually, you're moving this down a little bit, so it's important to understand that when we change this to draw, it's not going to look like what I designed, it's going to look like these letters of bubbles, right? and of course.
We can get rid of the contact part that extends by simply soldering it and that looks a little better, but it's not the same as this now. I did this using an S by creating an SVG in Adobe Illustrator, so you're welcome if you know how. to make SVG and how to fill things in, you can do it in Inkscape or Illustrator or you know some kind of vector program that can generate an SVG, but you won't get the same effects as me, so that's clear, but maybe you just want to crop it or such Maybe you want to fill it with your hands, maybe you like to color, in that case feel free to make the bubble letters and fill them with a marker or something fun like that, that's fine.
I think we are ready to try making these labels from step 3, cut and write your pantry labels. It's time to make these pantry labels that we designed, so when you're ready to get started, just click create in the top right corner and it sends it to your preview mat. Now I have this set up in my creator, which you can see here in the corner and this is what my preview mat will look like. Always check that you have a drawing layer and a cutting layer and there are no other mats for other colors or anything like that, you can have multiple mats if you are making a lot of labels but they should all have the same drawing and cutting in the same color of material, as we see here and I'm I'm going to rearrange her just a little bit.
I'm going to move the simple one here and then I'm going to put the bold one here and then this one here and this one here just so we can see them in order after we're done. We will click continue. and the creation process is the same for the scanning process, there is no difference how it will work, so our machine is connected, always make sure it is turned on and close to your computer, so our first step is to place them on label paper so click explore all materials and we'll look for the best way to find this is adhesive backed sticker paper and click done and your pressure is good as is so it tells you what to do load the black pen to hold a place your fine tip blade on the clamp B and then load the mat and press the loading button so now let's prepare the same thing but to cheer me up I have both machines connected so we can do them together like this that here is exactly the same project and me.
We have set this up for Joy, so let's go ahead with the same and click on the green "Do It" button in the top right corner. Now Joy asks us how we are going to load our materials and that's it. When making a label paper and that's not a smart material, we're going to say on the mat, so this is for any material and then we click on the mat and then we click on Done, it gives us this preview mat and again we need to check that we have everything the same color and it says draw it and cut it and this looks good, but we can change the size of our material from four and a half by six and a half to four and a half by twelve because we have a longer mat and I want do exactly the same thing that I did before and put them in order just to make it easier for us to see how they did in the order that we did them, so here's the simple, bold and elegant, there we go, so we click on continue to enjoy and we're going to do the same thing we're going to look for the right material now Joy doesn't have the same material available so what I found works best for label paper is to use premium quality vinyl and that's it.
Here and go ahead and click Done and I'm setting my pressure to less because it's a little bit stronger than what I need, so we have our creator ready to go and we have our age joy, let's go first for fun. do this at exactly the same time so you can see how it works. Let's move on to my work area and load up our mats so I have everything set up and ready to go. Here is my creator, if you don't. If you have a creator, you can also use a browser for this tutorial and here's my joy of being plugged in and ready to go.
Here are my materials and my mats. The pens we will use for Cricut Maker and Explorer are these pens let's say Cricut explore on them, they also work for the maker, we want the tip for the pen, that's important for this tutorial, the color doesn't matter just the size, so we're going to go ahead and take it out and then to the joy of Cricut, We're going to use your pens to make the Cricut Joy smaller and that means it has a smaller mat, smaller materials, smaller pens and even a smaller sheet , so everything is a little bit smaller, so we'll use the same tip size.
It's still a four millimeter fine point pen and that will be our pen again. The color isn't that important, so that's our pen now. For the real stuff, we're going to try two different ways. Let's see why just make it standard. label paper to see how that works that will do that on both the creator and the joy and then we will try the smart label writable vinyl which is really great and then we will compare and see which one really works better and another option which I won't show you but which you can consider is the glossy sticker paper so this is matte white and this is the glossy sticker paper so if you want your pantry labels to be clear this is an option that you can use. it'll be clear, okay, we're going to focus on now, we're going to focus on our full white label paper, so we have our two mats and it's important to note that these mats are specific to each machine that you have to use. the 12 by 12 or 12 by 24 in the Explorer manufacturer and you need to use Ford matte 1/2 inchwide or no matte if you're using a smart material like smart vinyl this doesn't need a matte as you'll see in a minute so they have some smaller mats.
I guess I can't remember the cards, yeah, okay, here we go, these are ready to go, so we have our label paper on our mats, we have our pens ready, so let's design the space. It tells us to load the black pen into the clamp, so we're going to do that for both machines. Here is an important tip. Before you put the pen into the machines, make sure it is primed and by that I mean, make sure the ink is ready. it flows so we'll just take a piece of paper and literally write with it and it's not unusual for it to start out a little light and as we write it gets darker so it looks good.
There it is, okay, we're going to go ahead and put this on the maker, so we open up the clamp and put it on the maker until it clicks, sometimes it doesn't click, but you definitely want this little arrow that you see here to mean the part. superior. from your stylus adapter so here that clip clicks there and then you close the clamp and then you put the cap on your stylus so it doesn't get lost so let's get the Joy stylus ready too and this one looks good it certainly is . a newer pen I just want to make sure it's about the same and it looks about the same to me so let's open up the cricket joy and take out the blade because it has a clamp attached to our pen, it won't.
I'm going to feel a little loose it doesn't lock the same way it's okay just close the clamp like this and put the lid on so it's ready to go so now we're ready to load our mats into our machines so to load the manufacturer or the Explorer, you press it against the rollers and press the charge button, the joy charges differently depending on how you want to place it, but as you get closer to the rollers it grabs it for you, there is no button, there is no charger on the button like this and this coolAlright, let's go back to the Cricut design space so our creators are ready and all we have to do is press the flashing button and our Joey is ready and in this case we press the green button on the screen, so I'm going to do this together at the same time so we can see them ready.
Now joy tells us to put the blade on so we remove the blade from the pen and press continue on the screen and both machines cut our labels for us so while they wrote our labels and now they're cutting them out and here we go they basically end up with a few seconds apart so to download the maker or the explorer you press the flashing download button and to download the joy actually press the download button on the screen and it will download for you and that's it they look wonderful, so here are the labels. Now let's take a closer look at the one we filled in with our pen.
Doesn't it look excellent? He did a great job. very bold and vibrant, the label on the left written by the manufacturer looks a little clearer than the one written by Joy. I'm not sure if it's because the pen is maybe a little older or the Joy marker is better, but I probably wouldn't know unless you compared them side by side. I think they would look really amazing, so those are our labels made with label paper. Let's get them off the mat. I always turn the mat over to loosen the material. Now let's take a look at the smart label material that is available for joy this is a recordable vinyl and you don't need a mat for it it's really cool this is the first time I've used it it measures five and a half inches by 48 inches long this is recordable vinyl which I've never seen before so this is pretty exciting and you can see if you look at the edges.
I hold it up to the light, it doesn't reach the edge and this is where the rollers are. We're going to place it on the edge, all we have to do is unroll it enough so you can see now that the Cricket Joy automatically feeds it and straightens it out as it does so. I actually put it slightly crooked initially and it fixed that for me, which was really cool, that's it, that's all we had to do and now we're ready to go ahead and write well, so let's get back to design space crooked and let's make sure we've changed our material to be the smart vinyl, so to do that we'll click on this material line again and see if it's up here.
The smart label writable vinyl is here, so we want to use the default pressure, we're going to put the black pen on. Here is our pen and remember that it does not lock and you must initially close the clamp. Now there is a note. Gel pens and metallic markers are not recommended for this material, so simply using the regular fine tip pen is the best option. right choice and everything looks great and it's time for us to go ahead and click go, okay and we need to put an iron vine tip blade on our joy so we take out the pen placed on the blade, close the clamp and we press go on our screen and it's complete and we press download, so there we go, we have labels, let's take a closer look at these, the ink is beautiful.
I have to say first of all that that's the biggest difference that I can see right away is that they look beautiful, let's compare these. to the ones we did before on the label paper so you can see a difference right away in the intensity of the ink, so putting it on this label this writable vinyl definitely makes the ink really stand out, so now they are very pretty, I know. What are you thinking? Can we use smart label writable vinyl on our Explorer or Maker cutting mats? Well, you know, I love trying things, so let's find out right now.
Here we have the smart label recordable vinyl and If you want to place 9 inches now, it's important to note that because there is this margin here right along the edges of both sides where the vinyl doesn't go all the way, you have to place it so that the labels move or you have this section moved a little so that there is vinyl right on the edge, okay, so load up our creator, let's put my pen in, close the clamp, put this on, everything looks good, moment of the right, oh, we should go ahead and do it. okay so we go back to the Cricut design space, things look good let's go ahead and press the button, okay that's done and it looks like it's done and it looks pretty impressive, in fact let's take a closer look to this, so let's compare the smart tag at the manufacturer on the left here with the smart tag made on the Joy on the right.
I think the maker ink isn't as flashy as on the Joy, but otherwise they look great, so it looks like you could use your Explorer or maker with smart vinyl: Step 4, apply your pantry labels to the containers in jars. Placing your pantry labels on your containers and jars is the easiest step. First, clean any surface you want to apply your pantry labels to with isopropyl alcohol and a lint-free cloth. a cloth or cloth, such as a coffee filter, this will help the label apply and stick better. Now carefully remove the label from the backing and place it on the container as straight as possible.
If you use label paper you will probably be able to reposition it if it is crooked, but you won't be able to reposition the smart label very easily if you are worried about it at all, just measure and mark with a pen that cleans up easily. Here's an important note about smart label. The vinyl can be peeled off the back with a finger just like I'm doing here, but if you find it difficult to lift, just peel off the vinyl around the label first and I definitely recommend removing any intricately cut labels on the label first. smart, otherwise your label may want to tear in the corners as you peel it off and I have a tip for you when placing your smart vinyl on a container, start at one edge and smooth from the edge to the other edge.
This will help you avoid wrinkles and bubbles, so this is the question I have and maybe you too have which of these is better: label paper or smart label writable vinyl. Let's compare the first two in terms of adhesion of smart label vinyl sticks. It is much better for containers than label paper. After just a few days the label paper was already starting to peel off my jars which was really sad, so if you use label paper you'll need to reinforce them with additional tape or glue, but that's not the case. You don't need to do that with a smart label vinyl ink application, the ink looks a little bolder and more vibrant on a smart label vinyl than on label paper, so that's another point in favor of the labels intelligent.
How about the appearance? I definitely prefer the smooth, bright white finish of smart label vinyl to the matte finish of a label paper and it is smudge proof so the ink is smudge proof on smart vinyl immediately after writing, whereas you need to give the label a little longer for the ink to dry, so you'll have to be careful when touching it at first. Eventually, both label paper and smart vinyl are smudge-proof. Now it's important to note that none of these are washable, if you wash them the ink will smear. But because this smart final surface is glossy, you can wipe coconut dust and greasy fingers with a dry cloth on smart vinyl labels much easier than regular label paper, which might absorb dust or grease. .
So far, if you think you'll be touching your containers often with damp or wet hands and don't want to risk smudging, simply spray them with a clear acrylic spray sealer a few times, you'll want to wait 5-10 minutes. between layers. I have sprayed labels in the past and that works quite well and protects the ink. Keep in mind that you will probably want to remove excess vinyl from your smart vinyl before spraying it, otherwise it may be difficult to peel off. your label, but when I look at all the factors between label paper and a smart vinyl, the smart vinyl definitely comes out ahead and that's what I will be making all my pantry labels on.
I am very pleased with the way my pantry labels are designed and tested. They have turned out, although I can't decide if I like the scallop labels better or the labels with fancy writing. I'll have to use both and now that I've tried making them in different crickets and with different materials, I know what it is. it's going to work better for me my vote is definitely for the smart label vinyl material and I'm going to use Cricut joy because I can go to the mat list and that's easier and I can take it right into my kitchen and it will be much more efficient I'm really impressed with this little thing.
I hope you found this tutorial useful. Let me know what you think. Also let me know what questions you might have about making your own pantry labels with your cricut. Ask a question in the comments. below this video or better yet, visit my fabulous cricut crafters Facebook group at Jennifer maker.com, delete Cricut crafters if you don't already have a Cricut to cut your own labels. I'm running a giveaway for a Cricut cutting machine. Yes, that's right, you can enter for a chance to win your very own Cricut. Get all the giveaway details in the jennifer maker comm slash Cricut giveaway and that's it for today.
Do you have an idea for a future tutorial you'd like me to do? If you can tell me what you want to do, I can show you how to do it until next time. This is Jennifer Maker reminding you to create the life you love.
If you have any copyright issue, please Contact