DIALux evo Tutorials for Beginners part 4 – Adding colors, textures and furniture
Jun 04, 2021DIALux evo video tutorial for
beginners
Colors, materials andfurniture
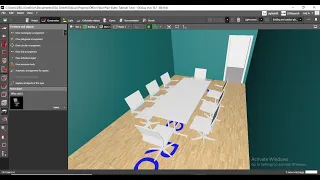
Hello everyone, welcome back to our video tutorial. This time we are going to add somecolors
, materials andfurniture
to the design. First I want to focus on work in the office and reception. This icon indicates Furniture and objects. Here are the objects I can use. This list is a record of the objects used. If you want to clear the record, you can right click on the gray area. to create almost any model in DIALux evo. I want to place it here. Enter a reception area desk made of squares.
To edit this square, click the move function above to rotate, zoom or edit. Convert the square to a parallelepiped, then I need the zoom function to make it look like this. You can also click here. Enter the numbers, for example, 2.4 meters, 60 centimeters and 85 centimeters. you can see the dimensions. Just activate the zoom button and it will be displayed. Click and then use the common Microsoft functions "ctrl + c" and "ctrl + v". In the bottom left corner you will see "A component has been placed." " so that there are two identical models in the same position. Remember the arrow function that I mentioned in the previous video.

More Interesting Facts About,
dialux evo tutorials for beginners part 4 adding colors textures and furniture...
When the blue arrow becomes lighter, you can move the component. You can see that these two squares are very close to each other . other. I kept the same length but reduced the depth and height. Can you see how these two squares change? From the plan view, you can easily use blue dots to place objects. Rotation distance is every 15 degrees. If you don't want to rotate the distance, you can always press the Shift key to rotate the reception desk around the office. Just hold the Shift key to move the objects smoothly. I have a stool option behind the desk, but these are not stools.

That's why we have a catalog of about 500. furniture The categories of these objects are Through these structural trees, let me see the office furniture. Find this bar chair in the chair directory and simply double click on it to send it to the software for use. and drop it into the CAD window. I can rotate this bar chair and press the Shift key to smooth it out. Now I want to add cabinets to the left and right sides. Let's go back to the object directory and do a search. the upper right corner. I can use this function to type S-H-E-L to find all cabinets with a shel name.

Select one from the list and double click on it. Some of the objects originate in the corners. some in the center, but it doesn't affect how they work. I can position it and resize it like this and make it a little bit smaller so it fits the space better. Now I'm going to copy it, press "ctrl-c". and "ctrl-v" to make it longer and stick it to the wall. You can also select one or two of them, put it on the other side of the room, copy a group and make it longer. Quickly complete the furniture configuration.
Now we focus on color. From the outside you can see the furniture we have placed. Nowadays everything would look much better if we added a little color. Here you can see the color settings. Let's choose bright. Blue can be saved by naming the color before using it. You can modify its reflective coating and its reflection coefficient. There are also three material effects: metal, spray paint or transparent effect. I will put this color on the wall and you will see that all the walls are painted the same color. If I select the material and drag it to the object, all the objects will have the same color.
By holding down the Shift key, I can assign a color or material to a surface. Now let's go to the other walls. Click "Select" on the raw stucco material. I don't want to select these
colors
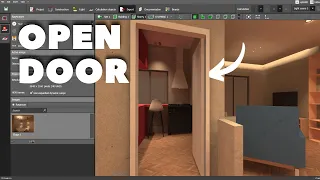
, but I use the catalog. There are two catalogs available. This is a catalog of colors with different RAL codes (R-A-L). Each color has its own number and can also be found by searching. The other is the materials catalog. exterior You can also use the search function here to search for "plast" and you will be able to find different colors of rough plaster.I can choose one and drag it to the wall. You will see that in addition to the color that I have painted before. The rest of the walls are mainly made of raw plaster. Nowadays, we all use dragging materials. I can also select materials, for example select glass as the material and apply it to the door. both sides of the door, just press the Shift key to create it. A transparent glass door. Now let's take a look at this building from the outside. From here you can see the colored walls of the office and this colored door.
Add some color to the exterior walls and ceiling as follows. Create your own material or select it from the catalog. There is a color catalog and a materials catalog. Once you click on it, a Choose Rough Plaster or window will appear. stone and use it for the exterior wall of the building. Now I have used this material for the entire wall. If you only want to use it indoors or outdoors on exterior walls, you can use the "Use Materials" feature. color and click on as many walls as you want with the mouse. Click "Use Materials." This is a list of materials that I have used recently and also includes other materials that I have collected previously.
It will also be imported. Now let's look for roofing material shingles. I want to select this and hold down the Shift key. Only the outside of the roof will have this color. Otherwise, the same color will be applied to the interior. It is the basis of processing. The material method now changes your furniture configuration, colors and materials to create a good design. See you in the next episode about lighting design.
If you have any copyright issue, please Contact

![[#10] DIALUX Evo Software - Indoor Lighting Calculation](https://i.ytimg.com/vi_webp/_ttRv72KVDM/mqdefault.webp)