Day 1 Dialux evo Training - Managers Office 3
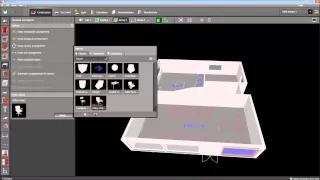
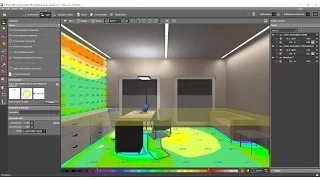
Jun 08, 2021Because we have now reached the required Lux level, we can now proceed with the calculation surface which shows the pseudocolor and the lux value, so let's close this from time to time and then go to the calculation objects, press this, return to construction and then select evaluation. zone now you can see that the evaluation zone means the green side is where all the calculation surface and the lighting calculation is done and that yellow box that you can see now is the calculation surface. If you click on this green room you will be able to let's say this is an
office
you can change it to any room you want for example if it's a school you can change it to a school and each room has different requirements so for now if you chooseoffice
, here is another tab, you scroll down and you will see that it is conference room, reception desk, practical writing, drawing or files, so let's select a file, sorry, our writing and reading tab and if it's going to the details you will see that it requires 500 Lux and the uniformity is 0.6 and yes You can see that the word work plane is now defaulted, like 0.8, which is correct for an office.
We need point 8 or point 75. Sometimes customers require 0.75, but in the SIBO dialog the default value is point 8, so let's use the default value and then you can. offset that calculation surface from the wall, the default value is 0, it means that the calculation surface is up to the edge of the wall and if we want it to be like point 5, say yes, now you will see that the calculation surface is now offset from the wall with 0.5 or 5070, so our room is now an office, so we can rename it manager's office and then pretend business work complains. Okay, go to the calculation objects again and then we will again create a calculation surface on the table, so select this result on the surface, click on it and then click on the table and then open the false color and the graph valid.

More Interesting Facts About,
day 1 dialux evo training managers office 3...
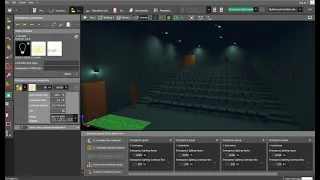
Why do you think we need this to open it? Because sometimes clients only require the tables with the Lux value, not the total. room, so in the office it is important to achieve 500 Lux on the table itself, it is not necessary or necessary to have a 500 Lux file in the corner or on the sofa, that is why we create a calculation surface on the table and again if We want to have another calculation surface on the wall. It's also possible to just click again, this resolves to the surface and then click on the wall and then click on the false color again and the valid graphic.

This is very important if you want to see the vertical. lighting or the vertical axis value and then you can also edit the number spacing here chi so line or the value graph and we say quantity click on the quality and then say 10 by 6 for example or 10 by 8 now increase the numbers or the quality of the numbers, you can also increase the quantity here in the table, select this one, go to the valid box, say quantity and then let's say 10 times 5 and now the value looks like this, it's a little bit smaller, okay, now I found out Our room has four last hard locks, so it's fine.

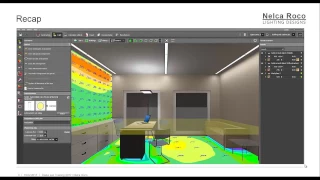
If you can see vertically and on the table you can see the pseudo color, the yellow is 750 lux and the light yellow is 500 lux, there will be a shadow from the laptop and also on this other side, but it's okay, blocking achieved 500, so the fixture selection and the height of the calculation surface is okay, it's done, so let's check now that we have our calculation surface, so again I showed it on the floor. so let's go back and show our calculation surface on the calculation result on the floor so again click on the result on the surface and then click on your floor and then click on the false color and on the valid graph for that again you can edit the spacing of the previous numbers.
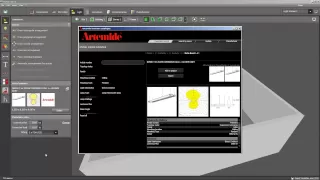
If you want, right click and now you have a complete lighting solution for an office. Later we will proceed with the calculation report. Okay, we're done with the calculation result. We achieved the required lux level and selected the perfect luminaire for this project, so now let's proceed to the documentation, but before going to the documentation, let's create views or images for this room, so just rotate your room like this and imagine who is a photographer and he will take a photo in this room so just do it like this make it as perfect as possible like this okay wash that's it and then you will go to export and then save the new view press this and then again if you want to see it so the color and number click. this table, the results overview and then press again save new view.
Okay, so now you have two tabs in your views every time you rotate your room and if you want to go back to that view, just double click on that one and you'll immediately go. Let's go back to those views, so let's go again and create other views, for example this one, this is perfect, okay, or let's do it like this or let's turn the door first, it's a little better in the image, click on the door, click right click and then press rotate. then just rotate it like this let's go back to the 3D view manager office and now it looks good and let's recalculate it because the result is now not updated so now the result is updated so let's create a new view and then yeah I think . this one is okay, let's align all the vertical and horizontal sides and then expand the extent.
Oh, so let's run, you shouldn't press that one, you should have rested a little bit, okay again, let's do it, it gets a line or vertical and horizontal, make sure your mouse is stable, so now we have this view, so make sure that okay see the wall is not showing correctly so let's cook it a little bit like this and then zoom in a little bit and then go to the export tab again and save the new view again if you uncheck this one it will disappear and then you can say save new view again and if you want to do the ray tracing, you can do that and say if you want to go back over this view, okay, let's create a nicer, better view from the decision, maybe that's okay.
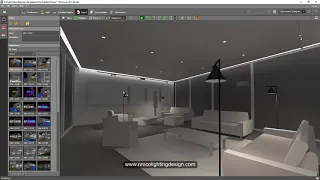
I need to create a nice view, okay, maybe this is enough, let's go back to this view. You see I just click on the tab and then go to the previous view that we saved. Okay, I think this is fine, and if I want to type, I traced it right and then I'm going to align it, yeah, if I want to reiterate it, just click like this to go back over the tab and then extend the scroll bar to the pixel type what do you want. I usually use one per thousand of four lines. by a fifty-bit cell zero and then start backtracking. 2D rendering is different from velocity tracking.
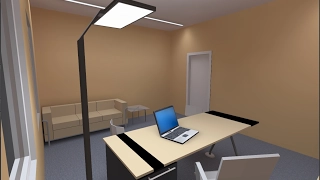
You can see the difference below. What you can see now is the normal rendering, but if it is a red stroke image, you can see that the glass and the window shows the glowing effect, okay, it will take time, so let's be okay now, it's here for that you can see now that the window has the reflection and this table, a glass table, now has a little less shine compared to the other one. This one is fine later. You will find out later that speed tracing is much better in rendering, especially if you have a glossy surface and also glass materials, so let's close this one and now we have a tab for retracing.
You can save your trace as a separate one by clicking this. one, then you can save it somewhere or it will save this one and add it to your calculation report, so let's do another one, maybe this side is fine, let's go to the skull again and view our first view, this is the view we created. and we'll do some ray tracing for this one okay let's cook it a little bit so you don't see the side of the door and let's say the ray tracing starts retracing again okay there you go now we'll see that the red layout looks better.
The reflection of the luminaire in the window can be seen right now it looks good, so let's close this one now we see that we have two pieces of red trail now here this one and this one okay, now we have collections of images and one more. go to the planet view expand expand go to this tab and now you can see that you have an option to also see the plan view of the 2D view where the pseudo colors are converted to numbers, so let's use what this also to a certain dot go to the store instead what appeared to show the wall also the other one okay then save the new view and then we can also create a view with the pseudo color so let's go back and click on this tab and then let's go to your display option and click show false color. then you can edit the false color value, but let's say let's make this one like 100 and this one is fifteen hundred blocks, so now you can see the difference of this color here, okay, I think this one is too high, let's make it fifty, then we can say this was save new view and again on the other side let's click on this, open this again in color, then you can say save new view and then it will be different from this option. and just with that with just one pseudo color because here you can see the sed number while the other one has no number ok, let's save other views maybe from top because most of the consultants prefer to see the last value from top view, there are more worry about horizontal deletion, so let's save this one, okay, let's fix it properly, this zoom in a little bit, then let's save the new view again, let's delete this to color and it should just practice, okay, and then let's delete this. reference as ours is shown, turn it off here, you can turn off the reference line here and then save the new view again, so now we have two four six eight nine pieces of image thumbnails that we can use later in our calculation report.
If you have any copyright issue, please Contact