Bushings and Gears: The Prequel
Feb 23, 2020So I got it into my head to build something, but I'm not going to tell you what it is, call me old-fashioned, stubborn, stuck in a rut, whatever you want, but as with most things I built, I like to use. parts and I'm going to need some parts to build my thing this video is going to be about some of those parts I'm going to need some
gears
no thesegears
these are just deer a head out there that I was hoping I could make work but no I can't? I don't really have them in the right sizes.
Frankly, they're just accessories, so you're not sitting there looking at me holding a pencil or calipers or something machinist II like with most things that use gears the size and number of gears largely dictate what that thing will look like, how big it is, where other parts will go, etc. in a way that you could say the gears drive the design roughly. I know what gears I want for this thing I'll build and see. which is the future and everything, I was just going to order them, but two things prevent me from doing so. First, I'm a big fan of immediate gratification.

More Interesting Facts About,
bushings and gears the prequel...
I want the gears right now and second, I realized I already have the gears I need. We are simply trapped inside this piece of cold rolled steel. Can you hear that in Michelangelo's famous words? We just need to break them off enough and mill them free, so here it is on the CNC router. I would like to get his attention. that hole that wasn't there a moment ago, the purpose of that hole will become apparent when this starts milling, but I found that for my router specifically on steel it doesn't like sunken end mills, especially the small ones, since it's high speed. spindle I need to use small end mills and with small end mills I like to brake at the slightest excuse when I can't get in from outside the stock tangentially.

I have started drilling these input holes and the one that is located between two of the gears in this case, the center of that hole, consequently, is also the origin of my g code, anyway, indicates the music, which you're seeing here isn't exactly conventional, in fact it could be illegal and probably immoral these gears. I mean, aren't they conventional gears? The drill is cutting material that will become the root of each tooth. This saves me the headache of using an even smaller cutter to go in and create a proper gear tooth profile. This would truly be unacceptable. gears, but for what I'm doing it should be fine, which brings us to milling.

This is a 5/32 flute carbide end mill that runs at 9000 rpm and if I'm not mistaken, about eight inches per minute, the reduction is six teeth. The 5/32 mill reaches just below the root, it is too large to reach the bottom and completely form these teeth without counting the drilling operation. I'm doing this with two toolpaths, the first does multiple depths and leaves 10,000 in space, the largest gear has four and the smallest has three. The second tool path is a full depth finishing operation using the same cutter. I made three gears in total, 222 and 110 teeth. These are pretty vanilla spur gears and they started life. in cad with its bluetooth shaped standard, i mess around with the shape a bit to make it easier for me to mill on a router.
You can probably tell just by looking at them that they are very special; However, these are 8 pitch gears, that's the effective size and they have a 23 degree pressure angle, none of that really matters for what I'm doing and the pressure angle is a little strange. Typically you would see fourteen and a half degrees or twenty degrees, the larger pressure angle gives me more. gap at the bottom at the root of the tooth which was my main concern because of what I mentioned earlier on the router, that I didn't want to route steel with needle shaped end mills and consequently larger angles also lead to teeth stronger, so there is more load capacity, which is good in my case, but the operation of the gear set will not be as smooth and they will have a little more backlash or a lot of lost movement between the meshing gears, which again for this particular app they are tradeoffs I was willing to make. so all I did was brush these straight out of the machine, they feel, I don't know, relatively decent.
I'm going to give it a couple of licks with a file right where the 2d milling tool path hits the drilled hole. Don't know. I know if you could tell, but there's a little bit of a sharp edge, the teeth look a little like arrowheads. I had a little hiccup with one of these. I got off to a bad start with the G-code. I forgot to reset my origin for the Single Gear and it managed to punch a hole before I could stop it. Reesy road and I started it again thinking what are the odds of that drilled hole hitting one of my teeth and by the looks of it I should start playing the lottery. a little more often he managed to get quite deep before I could stop him, but he didn't get through to the other side.
Now this larger spur gear took about 25-30 minutes from start to finish, so instead of cutting another one, I think I'm just going to fill that in with some TIG welding and file the tooth so it forms nicely when it comes CNC routing. I guess the old saying is true, you take the good, you take the bad, you take both and there you have the facts. Being completely unbiased, I can safely say that these are some of the best-looking gears I've ever seen. Next, I have some honey caps to make this carry brass on its head towards the lathe.
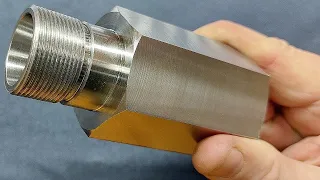
I have a half dozen of these to make, that would be 0.5 dozen for the metric crab and then an odd socket which we'll talk about once I've made it, so I'll go through them pretty quickly without much fanfare. They are pretty simple actually, the only point to note maybe is that I will be running the lathe backwards, not backwards but turning away from me to make it work as I am still cutting on my side of the cylinder head which I turned around. the tool upside down, I find that bronze and brass have a bad habit of throwing very fine, chipped chips everywhere, turning my cutting tool upside down and running the lathe backwards will hopefully shoot all those chips out. the chip tray and, with a little luck, not directly into My eyes here are six regular sockets.
I guess technically they're called flanged
bushings
, maybe pushbushings
, I don't know, but conventional six and the seventh is the oddball. I think I mentioned before, we'll get a better look at why this looks like this. It does when I put these pieces together, but for now suffice it to say that when you see pieces like these, unusual and unconventional, nine times out of ten it's a sign of lazy design. Whoever designed this momentarily fell asleep at the wheel. Lucky for me, they don't fine amateur machinists for knitting, so seven bushings and three gears. I was going to end this video here, but since I'm knocking them out in less than 10 minutes, let's go a little further to put all of these pieces together.I'm going to need three shorts. I'm doing this in a chuck to help maintain concentricity between the two ends of the short shafts basically because I have to turn the part over, frankly for what I'm doing it's no big deal. The tolerances I would have gotten from my three jaws probably would have been fine, but I was forced to have them I guess, so this shaft I just saw made will be the high speed drive, it can be driven from both ends and now requires the gear smaller. the larger gears are keyed because frankly I have room for a key, this one isn't key shaped and this would have cut the gear into two pieces so my plan is to braise it now.
Ideally this would be done as one solid part. The gear is part of the shaft. I couldn't do that because I don't have gear cutters and because of where it will be located on the shaft, some depth from one end, I wouldn't have been able to cut it. on the CNC router, the way I made a 2D profile, it would have been too long for those little end mills, so let me get out the torch and we'll glue these two together. Would you believe I just spent? 30 minutes rummaging through my garage looking for a welding rod.
I know I have it because it hasn't even been there for two weeks. I don't think I found it on a shelf. I thought it would be best to wrap them and put them in a dry place. before the whole flow starts to blow up, they were the ones based on silver to know how much those things cost, that's like losing track of a hundred dollar bill, well I think that's enough for this video , not much happened, but maybe you like something. Again, this takes some time away from the official build video which should hopefully be out soon.
I hope everyone is well and, as always, thanks for watching.
If you have any copyright issue, please Contact