Beginners Guide to Kombucha Making | How to Make Kombucha at Home
Jun 06, 2021Today I want to share with you my beginner's
. I will
?
guide
tomaking
kombucha
. I will guide
you step by step from start to finish, plus we will do a second ferment with the foods and diagnose common problems you may encounter and I share with you how to prepare them hello dear friends, I am Mary and welcome to Mary's Nest where I teach cooking skills traditional formaking
nutrient-dense foods like sourdough bone broth ferments and more, if you like learning about that stuff, consider subscribing to my channel and don't forget to click the little notification bell below that will alert you every time Please upload a new video, so what exactly iskombucha
?
All it is is a fermented tea and it's usually a fermented black tea and it's fermented with something called Scobie and Scobie means symbiotic culture of bacteria and yeast. It's that easy. Now this Scobie, this symbiotic culture of bacteria and yeast has adapted over the years to survive on caffeine, among other things, found in black tea and stuff. why making kombucha with black tea often works best and that's what I recommend you start with if you're a beginner. Yes, if you get a strong enough Scobie over time, you can adapt it to brew with green tea.

More Interesting Facts About,
beginners guide to kombucha making how to make kombucha at home...
Some people have even tried it. success using herbal tea but for a beginner I recommend you start with black tea and this is just organic black tea. Now what you will need to
make
kombucha is a gallon sized jar. Any gallon-sized jar. This is a glass jar. You're going to want eight, like I said, black tea bags, you're going to need your Scobie and you're also going to want a cup of sugar and you're also going to want two cups of pre-brewed kombucha, now don't worry about this. Kombucha made above because you may be saying I'm a beginner.
This is the first batch I'm making. I don't have previously made kombucha. It's not a problem now to get your Scobie, if maybe someone would give it to you. or if you bought it you might be able to get some kombucha, just regular old kombucha, sometimes a friend who maybe gave you the scoby can give you some or when you buy ask OB online, sometimes They also send you enough kombucha to use.
make
your first batch, but if all you have is scoby, don't worry, the reason we use this pre-made kombucha is to help give the new batch the right level of acidity, but in a pinch if you don't have that. and this is your first time making kombucha, you can use two tablespoons of vinegar, but you want to use distilled white vinegar and the reason is that if you try to use apple cider vinegar or raw apple cider vinegar, especially that can have eels vinegar now they are not actually eels their little nematodes and they are not harmful to humans however they can eat your scobie so if you add vinegar because you need to achieve the right level of acidity that the scoby will have.
Be happy using distilled white vinegar. Now a lot of purists really don't like you using vinegar. Kombucha purist filmmakers don't like the idea of adding vinegar, but if you don't have the slightest ability to just get a previous batch. kombucha, so I really think it's okay to use especially to get your kombucha going and the last thing you're going to need is just some clean cloth and a rubber band or kitchen twine, that's what we're going to use. to cover our jar here now well we're going to start and we're going to fill this with three quarters of water that we heat well I have my water heated and I like to bring it to a boil just if I were preparing tea as if I were preparing a proper cup of tea.
Now it has to cool to a certain temperature after brewing the tea before we can continue, but I really like to bring the water to a certain temperature. boil I know some people don't do it, but I think if you were making, like I said, a proper cup of tea, you would bring the water to a boil, let it cool a little, put it in your tea bag and proceed, and it would That's supposed to make the best cup of tea, so I think to ensure that we get the best flavor out of kombucha we need to start with a process that makes the best cup of tea, so I'm going to pour my first two quarts of water into this measuring cup. , put this back that is heavy and we will pour it into our jar and you want to make sure it's a clean jar, that's a very important thing, not just for working with kombucha or any ferment, you want to make sure you keep everything very well. clean because you don't want to introduce bad bacteria and give them the potential to proliferate on the good bacteria and the good yeast and now we'll get that last liter of water.
Here goes our final court to bring this to a total of three quarts of hot water and the reason is not only interesting because we are heating this water so that the sugar dissolves in it but, like I said, we are also making tea, so we need to have some hot water now. what I like to do is take a piece of string and tie my tea bags and for this gallon size jar we are going to use eight tea bags, like I said this is caffeinated black tea the reason I like putting them together is that it just does it.
It's easier to get them in and out now. We could go ahead and just put the tea bags down like this, but in case they slide, I wouldn't want the little pieces of paper to fall into the water too, so what? I find it easy to do, like I said, I tied them all together to keep them together and then I just like to remove these little pieces of paper that are on top of the tea bag strings and we'll just dip our tea bags in here and let them sit now we're going to let them steep for about 10 minutes and that's really all you want to do technically if you were just making a cup of black tea you could let your cup of tea steep for three to five minutes but Scoby really likes caffeine, so we're going to let it steep for about ten minutes, but you don't want to let it steep for much longer because what can happen is the tea becomes too strong and then it can fail. flavor when you're finally going to brew your kombucha properly, we're going to let it sit for ten minutes and then we're going to remove the tea bags and I'm going to show you how to remove them properly.
We're going to let these tea bags sit for ten minutes now go ahead and remove them and I'll show you what you want to do as you remove them, don't squeeze them or press the tea bags against the side of the jar, just grab a plate to catch all the grease. that you can leave. drip a little bit like this and then just take them out one, two, three, you don't want to squeeze them because you don't want to release too much tannic acid which can give your kombucha, your final product, kombucha, a very strong flavor. so just let it sit for ten minutes and then gently remove the tea bags.
Now you want to go ahead and add your cup of sugar. This is a cup of white sugar. This is an organic white sugar, but it is the white sugar that works best for
beginners
. I fully recommend doing it this way and the yeast and bacteria will consume much of the sugar. Yes, this is a sweetened drink that will still taste very spicy if you've ever tried it at the store. I bought kombucha that was almost vinegary and effervescent but with just a hint of sweetness because the scoby, yeast and bacteria in the scoby feed on some of the sugar, but not all of it, so I know it's a concern for people trying to avoid the sweetened drinks and in that case I recommend that to get good probiotics you rely more on your fermented vegetables instead of these fermented drinks that require adding sugar, so we're just going to help the sugar dissolve in this hot water, but it should dissolve pretty quickly. and then we'll just let this cool, we want it to cool to somewhere between 68 and about 85 degrees, we don't want it as hot as it is right now because that will damage the scoby, but this heat will help the sugar.Dissolve and then let it cool. No, I usually let mine cool naturally and then do other things around my house, but if you're in a bit of a rush, you can always put this on. You can pick it up. this jar and put it in a little bit, it's a little bit hot so you might want to use potholders and put it in a little ice water bath if you have a little bucket, a little dish bucket like, oh, I have one in my sink in there and I put a little bit of ice water, a little bit of ice and a little bit of water, do a little ice water bath and then you can pick this up and put it in there to help it cool down faster, but like I said, usually I let it cool naturally.
I have left this. cool and I use it to clean the thermometer, the food thermometer to check it and it's below 80 degrees, then it's red, maybe around 77 and 78 degrees, around there, so it's perfect and we can get ready to continue with the next step, but before doing it I just wanted to explain to you what I mentioned before. If you need to cool this down quickly, what you can do is take your jar of tea and put it in a container like this. This is what I was talking about. This is my little washing container. in the sink, but you can put it in a container like this, fill it with cold water and you know up to about the height of the one in the jar and let it sit there in the cold water, you can add some ice cubes. and let it cool that way and it will cool a little faster.
Now don't worry, if you don't have a food thermometer you can definitely check this by saying it's room temperature, that's what you're looking for, 68 to 85 degrees. it's a nice wide range liquid of that temperature it feels cold to the touch not even really this is like I said it's between 77 and 78 degrees you can take a clean straw like this you can take some out just put it on your wrist like this They used to check the formula of the baby in the old days and it just feels comfortable, then you will know that there is a nice comfortable temperature, you can easily put your hand there and that is a suitable room temperature.
Now we're going to go ahead and add our kombucha from a previous batch and we're going to go ahead and pour it in and now if you don't have this, don't worry, we're going to go ahead. I'm just going to mix that up a little bit. to get every last bit, don't worry if you don't have this, like I said, you can go ahead and add the two tablespoons of white vinegar, distilled white vinegar that has been pasteurized so you don't have to worry about the yields of the vinegar. that may damage your Scobie and you can add a little more filtered water.
I'm going to wash my hands before I even touch the scoby. I have it here on the plate in some kombucha and I'll get ready to pick. that up and we're going to put this in the jar with very clean hands, it's very important, okay, my hands are good, clean and dry, and we're going to get ready to put this Scobie in this jar, but before we do that I just want to mention Yes You don't have a Scobie, if you haven't been able to get one from a friend and have to buy one, I'll put a link below where you can order them.
There are many places where you can order them. You can even get them on Amazon, but if you live in an area where there may be a small boutique brewery that makes kombucha, they may actually sell it, so that's something to also consider now when you go to pick it up. We're going to find that it's very flexible and it feels a little bit gelatinous and it may be like that where you had, it's got a little bit of a coating and that's okay, this is a very nice, healthy, thick Scobie and we. We'll go ahead and put it in our jar, perfect now, don't worry if it floats, don't worry if it sinks either way, okay, now we'll let this ferment for at least seven days and at seven. days we will try it and see if we like it some people like its flavor after seven days some people prefer it maybe after ten or fourteen days.
I like it nice and spicy, so if you like it nice and spicy, you'll probably be more inclined to go 10 or 14 days if you like it a little sweeter, then seven days will probably be good, but when you're ready to try it, I'll do it. What you'll want to do is get another clean straw. We'll use it to test the temperature and the Scobies don't like metal. Now it's not the end of the world if you put a teaspoon in there, but in general they just don't like metal, so the best way to take it. a little taste is just put the straw in, take out a little bit and then try it and if you like how it is then we're ready to move on to the next step, but for now we're just going to let it sit for seven days, we'll try it at that point and if we like it, great, if not we'll leave it for 10 or 14 days, so what we want to do at this point is take the fabric that we talked about before. a clean cloth and cloth work well for this, the coffee filters you've seen me use may not fit completely and some other ferments like making vinegar and also, if you have any problems in your house with fruit flies and that kind of Having a nice thick cloth really helps prevent them from getting into the kombucha, so now what we want to do is keep this in a warm place, you know, room temperature, warm, like I said, in a warm area. 68 a85 degrees in your house, out of direct reach. sunlight, so you can put this in a closet and then go ahead and check it in seven days.
Well it's been 14 days now and I reviewed this at 7 days but it's still too sweet for me and now I reviewed it at 14. The days took a bit of testing and it's perfect just the way I like it now if you taste your kombucha at 14 days and you still feel like it's a little sweeter than you'd like, you can let it go a little longer, some people let it rise. About 20 days ago what I want to show you is this is the original Scobie that we started with and I'm going to overlay an image and when you go to put this like we did at the beginning when we were originally making our kombucha, it can float a little bit on the top, it can sink to the bottom, it can float to the top again.
That's completely normal, what you're going to notice during those seven to fourteen or maybe even twenty days, if you let it go a little longer, if you like it spicier, is that you're going to start growing another Scobie right here. upstairs now I'm going to wash and dry my hands well before I come in and we're going to get these Scobie's out and then I'm going to show you what you're going to do next. Now what you want to do is get some kind of bowl or even another jar like this will be fine and you just want to get those two scobies out of there sometimes they will be connected sometimes they will have been separated it really depends now this was our original and this is our new one now it's on top with the original.
This is one you can give to a friend if you have someone who would like to make some kombucha. If so, you can give him this and give him some of the initial tea. and they will be ready to make another batch. Now there are many different things you can do with this Scobie. I've heard that some people cut it up and throw it in their garden as fertilizer, other people like to put it in. in your compost pile and I've even heard that some people cut it up, dehydrate it and make it into Scobie beef jerky.
I haven't tried it, but now it's very intriguing if you want to give it to someone and don't have the ability to give it to them right away. Do not refrigerate. Many people make that mistake. I don't like the cold and if it's cold it can grow mold and it can be very difficult. to then get it to make good quality kombucha and even if it doesn't develop mold because the cold weakens it, it can make a weaker kombucha, instead what you want to do is create a Scobie hotel where you keep your scobies at room temperature and the Scoby Hotel really can be any type of container, even a jar like this where you just put your Scobies, put some kombucha tea in them, and then keep them at room temperature.
Now this one in the bowl, here's our baby Scobie. and this is our new Scobie and sometimes it will be a little bit lighter on top where it was more exposed to the air and then underneath you will see that it looks a lot like mom's Coby and you may even find that it has layers. like that and that's completely normal now, when you go to ferment another batch of tea and turn it into kombucha, you can go ahead and use this new Scobie, now your kombucha at this point is ready to drink, however, if you want to make it fizzy, So you will have to do a second ferment now before doing anything you want to stir well so that all the good bacteria are well distributed throughout the amount of liquid.
Here there is even some effervescence and then the The next thing you should do is pour two cups and this is very important. Now with these two cups you need to set them aside to prepare your next batch of tea or your next batch of fermented kombucha tea, so you just want to go ahead and pour it over your scobie and now you're all set, you can go to your hotel Scobie Motel until you are ready to brew your next batch of kombucha and just to clarify, this is a 2 cup measuring cup so that is 2 measured cups of the kombucha tea that you want to set aside and set aside to brew your next batch of tea of kombucha.
Now, when it comes to making the second ferment, you have a couple of options. You can use different types of bottles. I like to just put it in a bottle. like this one that has a screw cap and some people like to put them on. This is a small version, but some people like to put them in these bottles that have the flip top and the reason is that they will really hold up to the carbonation, but like I've shared. with you in the past, I really don't like to put anything that's fermented and fizzy in these flip top bottles, they can break, so if you decide you want to do the second ferment and something like this, I would recommend burping. this every day or every other day if you decide to store it in your refrigerator for a while just to make sure it doesn't carbonate too much and as a second preventive measure I would recommend putting them in some type of plastic container that has a lid so , in case they break, and sometimes they do, at least you have it all contained in your plastic container and another point I want to make about flip top bottles if you decide to do the second ferment in this type. bottle, be sure to use a bottle made for effervescent drinks;
You'll often see them sold by
home
brewery type companies where people brew beer athome
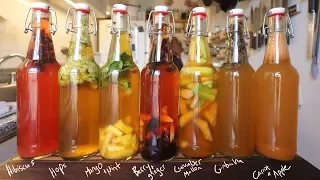
, etc., so you have a bottle that is specifically made to resist carbonation, but my attitude about kombucha is that it is made with sugar and although scoby uses a lot of sugar there is still some sugar left so it is a sweetened fermented drink and if you are watching your sugar like me As I mentioned above you will really want to use fermented vegetables as your main source of probiotics and I have a playlist complete where I make all the different types of fermented vegetables and I will link them in the I cards and in the description below, but the reason I don't do a second ferment in a bottle like this is that it is not necessary for me to maintain the carbonation for a long time.I feel like kombucha is like a lot of fermented drinks that are sweetened like fermented sodas and that I've done with ginger bug and stuff in the past really is more of a treat so I'm fine with making them in screw top bottles, they'll keep the carbonation for a day or two and we drink it in a day or two and then I don't have to worry about it now when you proceed with a second ferment that's when you add the aromas you can make a ginger kombucha you can make a ginger kombucha lemon, you can make any type of fruit kombucha I have strawberries here, berries are great for making flavored kombucha, really any mix you want and that's the great thing about making homemade kombucha because you can make any flavor you want, you can even mix the three, you could have ginger. lemon berry kombucha you can really use any fruit that is in season and the natural sugars that are found in the fruit will help feed the kombucha and cause the fizz which will feed the good bacteria and that will release CO2 and that is what causes the Fizz, that being said, if you decide that you just want to make a ginger kombucha or you just want to make a lemon kombucha and this is a Meyer lemon, if you can find them when they're in season, they're very good, the sweeter. than a traditional lemon, but either way, if you make something like this that doesn't particularly contain ginger and doesn't contain a lot of natural sugars known to get a really nice fizz, you might want to add in a little bit of sweetener at this point which will help To feed the good bacteria, you could add a little bit of raw sugar, you could just add white organic cane sugar or you could use the raw sugar that you dried, you know, you often see it as a quick aura or something like that.
You can add things like that, it's just dried cane juice, any kind of real natural sweetener that you want, that would feed the good bacteria and that will help in the case of a lemon or ginger that doesn't have a lot of natural fruit. sugars like berries or other fruits that you would use in season melon is very good pear can be very good there are a lot of different things you can do in terms of flavoring them now let's talk about how we are going to flavor this if you want to make a kombucha from lemon, you just want to put a little bit of the lemon juice in your bottle and really, at this point it's trial and error, you'll want to experiment how much you like it, but maybe a half of the juice from this lemon maybe makes two bottles of lemon and Put the juice of half a lemon in each bottle with a little natural sweetener.
Same thing with ginger again, about an inch, chopped and put in your bottle. a little bit of natural sweetener that will be delicious now if you go ahead and use lemon juice. It's perfect because you won't really need to strain anything before serving if you have the ginger bits you might want. You don't need to know that it's basically going to float to the bottom. You don't have to strain it, but you might want another option: puree the ginger or grate it very, very finely, where it's basically a puree and then. It will just be floating at the bottom and you don't need to worry about it if it is in small pieces because of the natural fizz that will be created in the second for men it can float to the top so when you go to drink it you will have that little piece of ginger in your mouth, so you might want to strain it and the same goes for any type of fruit you want to use, you just want to cut it up, put it in your jar. just a little bit down here and then you're going to pour in your fermented tea and then you're going to let it ferment, but again when you go to drink it if you just put pieces of fruit in when the fruit makes it come out of the jar or bottle so you might want to strain it, however, just as I mentioned, grate the ginger very finely to the point where it is a puree, I really prefer to puree the fruit and especially if there is any. seeds and all that, take all that out and just take a little bit of mash and put a little bit of that in the bottom of the jar or the bottom of the bottle and that way you'll get a delicious second ferment and when you go to drink it there's just a little bit of puree, you know, you don't shake the kombucha too much because it can be a little fizzy before you open it, but after you open it and swirl it around a little bit, that puree just goes away. to mix with the rest of your fermented tea, your kombucha and it's very nice, so the choice is really up to you, but today what I thought we would do is make a nice strawberry kombucha, now what I did was just wash and cut about a cup of strawberries, that's all you need for about a 16 ounce bottle and I removed the stems, washed them, cut them up and now I'm going to send them to a world to puree them, that took me about 30 seconds and now in this period, if you don't mind the little strawberry seeds, you can go ahead and pour this right into your jar, but what I'm going to do is take a second step and I'm going to run this through a small fine mesh strainer just to get those seeds out and have the strawberry puree nice and smooth, now I have all of this beautifully pureed and I removed those little strawberry seeds and I just go To use a funnel here to get this into my bottle now because it was basically a cup of strawberries Before pureeing, there's probably enough fruit sugar here to give it a nice flavor and to give the kombucha enough food for the good bacteria. into the kombucha to create some fizz, but if you want to sweeten this a little bit at this point, you certainly can, you can add a little bit of honey, you can add a little bit of maple syrup, you can add like we said with the ginger and the lemon, You can add. a little bit of organic white cane sugar or a little bit of dry cane juice, whatever you want now before we get ready to put this in the measuring cup to pour it just to make it easier to pour it into the bottle, we want to give it another good mix. because this is a problem that you can encounter a lot of people sell my kombucha it didn't come out very good it didn't become very fizzy it didn't taste very good whatever the case may be and that may be because I won't give it to the mother here, the tea of main kombucha, a good stir to distribute those good bacteria very well throughout the liquid, so make sure you stir it well, yeah, look, this is even a little bit fizzy naturally and I'm just.
I'm going to go ahead and pour about two cups, like I said, this is my two cup measuring cup and then we're going to go ahead and pour this right into our bottle. Now, as we get closer to the top, we want to make sure we get out. at least an inch or so. I'm sure with my thumb that there is about an inch of space in the head to allow for carbonation. Then I have another clean spoon here with a clean handle and I'm just going to stir this around to help incorporate. You can use all that strawberry puree too, you've seen me.
Often when I make homemade vinegar I use a wooden chopstick which works great and one of you shared with me that Mary can use the handle too. from the wooden spoon and I thought that's great of course, so as you'll see, the tea itself was pretty fizzy on its own, but now adding this puree and the fruit sugar that's in there will really help it become effervescent. What you want to do is just put the lid on it, tighten it, and place it somewhere at room temperature anywhere you know of yourkitchen and pantry, in any case, out of direct sunlight and you will want to leave it. for about three to five days you can even reach the level of fizz you want after two days if you're doing this in very warm weather and your kitchen is very hot, but usually three to five days we'll get it nice. and fizzy and I recommend that after the second day you come and give him a little burp so that he doesn't accumulate too much CO2 and too much carbon dioxide and create any problems for him, so after the second day he just comes and burps. and after three to five days when it looks nice and effervescent and you are happy with how it looks you can refrigerate it at that time and once it is cold enjoy it or you can enjoy it at room temperature or you can pour it over ice and enjoy it however you want now a little tip I want to share with you I highly recommend that you put your jar and I always tell you this when we do any type of ferment you may want to put it in a jar because this is not a 100 percent airtight seal and like now it's true that we have left 1 inch of head space, but as it ferments, sometimes a little bit can come out the lid and down the sides and this way, by having this in a container, you can keep your countertop tidy and clean, or if you have it on your pantry, keep everything tidy and clean and the other reason why it's good to have it in a container like this is that when you go to burp sometimes you can overflow a little bit and again this will keep everything tidy. and clean it now after the 3 to 5 days when it gets to the level of carbonation you like and go ahead and put this in your refrigerator to chill, if you are going to drink it that same day it will probably be very fizzy since this is not a flip top bottle, so it's not very tight and after a couple of days it will start to lose some of its carbonation, so if you're interested in keeping it highly carbonated then you'll want to use that. the flip top bottle instead of these screw top bottles because after a few days you will start to lose carbonation but like I said this is more of a treat I say chill it, enjoy it pretty quickly and you don't have to worry about dealing with the rocking of the bottles and now with the rest of this kombucha tea you can go ahead and do a second ferment like we did here, you can do more different strawberry flavors or you can just drink it straight as is, whatever the case may be.
Now it's totally up to you, I want to talk about diagnosing some issues you may experience as a new kombucha maker if Scobie has little tendrils falling off as you see during the seven, 14, and 20 day process and I'll overlay an image so you can You can see what I'm talking about don't worry it's very normal so if you see that happening it's not a problem and the next thing I want to mention is that if someone has given you a Scobie or if you bought a Scobie keep it at room temperature in the kombucha tea you were given that came with the one you bought or that a friend gave you.
Don't put it in the refrigerator like I mentioned before because that will make it harder for you to make kombucha with it now that you get your Scobie, whether you bought it or someone gave it to you and you're ready to make your first batch of kombucha or you are ready now to make your second batch. of kombucha now that you've made your first time here with me, don't rinse the scoby, never rinse your Scobie with water or anything like that, you just want to let it sit in your tea and be ready for it to make your kombucha and whether it's making a batch of kombucha or keeping your Scobie in a Scobie hotel, don't leave it in direct sunlight, keep it at room temperature, but keep it out of direct sunlight and the reason you don't want to do that.
Keep it in direct sunlight, as with any ferment, the rise and fall of different temperatures can create a very inhospitable environment for yeast and bacteria, so you always want to have it out of direct sunlight at room temperature. Now let's say you find yourself drinking a lot of kombucha and you're making kombucha every day and all of a sudden it seems very weak and it's not, it's not doing a very good job but it's turning into that nice fizzy, spicy drink that you're into. accustomed, the reason is that you generally want to wait. about seven days, so now that we've brewed this batch, we've got the two cups out and we've got our kombucha in our kombucha hotel or the Scobie hotel in that tea, do you want to wait, or do you want to wait to find out if it's good to say two weeks that you want to wait a week seven days for this particular next batch of kombucha starter tea and these two cups to build some strength before using it as a starter to make your next batch, so always try to wait. seven days between making each batch of kombucha, so after seven days you start with a clean jar, you make the tea, you add the sugar and then you add your new Scobie, your baby Scobie that you grew up and that's your fresh Scobie, you put it in your jar. you add two cups of your starter tea which is now a ripe starter tea because it's been here for seven days and you put that in and then you start the whole process again and that should make a nice batch of kombucha now a Some other things I had discussed during the process of making this batch of kombucha in this video, but I just want to go over again, remember not to over brew the tea and don't squeeze the tea bags because the tannins will give it a bad taste. your final product and something I want to emphasize is that if you want a flavored kombucha like we did here, it's a two step process, you have your first fermentation and your second fermentation, do not add flavorings in the first initial ferment when you have your Scobie in this jar and you are fermenting the tea.
You want to do it in two steps. If you add flavorings to your initial batch, you can create problems. What can go wrong is the different flavorings you can add, whether it's fruit ginger. lemon lemon other fruits other herbs and spices can actually inhibit the growth of your Scobie, that's why we do two ferments, the scoby only wants to be in black tea sweetened with sugar and another problem that I mentioned earlier and I just want to emphasize again is before To start the second ferment, be sure to stir your Scobie well, stir it well the first time when you take out your two cups of starter tea to set aside with your Scobie to make another batch in the future and then give it a good stir before pouring it into the jar or into the bottle where you're doing your second ferment, that's really important because you really want to distribute those good bacteria and the next tip I want to share with you that will help you prevent a I have a lot of problems and I get a lot of questions about this.
Can I use a non-caloric sweetener? You can say that it would be a non-caloric sweetener. No, it doesn't work well. What happens is that the scoby needs the sugar to eat the yeast and the bacteria that have this symbiotic relationship in the scoby need that sugar to eat, so you don't really want to use a non-caloric sweetener, it won't work well, you have to give it food. to the scoby and that food is the sweetener so that I said before that if you want to avoid sugar, it is best to use fermented vegetables as a source of probiotics instead of these fermented drinks, so I hope you try making homemade kombucha, it is very fun and If you want, learn more about traditional nutrient-dense cooking, be sure to subscribe to my channel and then click on this video here where you can make other fermented drinks like a ginger bug for homemade ginger ale and water kefir and let us know. we see. there in my Texas Hill Country kitchen love and God bless you
If you have any copyright issue, please Contact